Showing posts with label bouldering. Show all posts

Friday, August 1, 2014

Maximize your climbing performance for October

Goal:  Flash Twinkie in October

How I am going to do it:


Time to start training for peak performance in October.  Ideally, you will have rested during the last couple weeks of July.   I did one better by driving cross country, visiting with friends and putting on extra training weight with good food and beer.

I plan to keep the muffin top through the strength phase, to maximize value of the hangboard routine.

I am back at the Dojo now, and have started my new training season.  I plan to continue the steady progress I started in the spring season by following a plan based on the Rock Climbers Training Manual by the Anderson brothers.  Here are the key steps to getting started: 
  1. Rest!  Take at least 7 days off from climbing and any training that involves pulling with your hands.
  2. Plan your season.
    1. Assess last season and identify your weaknesses.  For me: 
      1. Endurance on small to medium holds
      2. Finger strength
      3. Resting efficiency
    2. Select concrete goals.
      1. Climb "Twinkie" first try (technically not a flash, I climbed it 19 years ago)
      2. Send: Betavul Pipeline, Check Your Grip, All the Way Baby, Tissue Tiger, Gung Ho, Narcissus, Super Best Friends. . . .
    3. Schedule your season training cycles, including season highlight trips.
      1. See above.
  3. Start climbing again with your first training cycle
    1. ARC (endurance), body weight fitness and skill training.
  4.  Keep good records in your training and climbing journal.


October will be here before you know it!

Friday, May 16, 2014

How training can spur greater improvement.


How to read this graph:   The four rectangular shapes represent the four types of training / fitness combinations directly related to forearm fitness described by the Anderson brothers in RCTM.

ARC/MSS (moves: 60 to 700; intensity: 10% to 40%) this training involves large numbers of consecutive moves at low to moderate effort levels, and requires climbers to manage their level of pump by controlling their activity and resting behaviors.  Seldom will performance oriented climbing days include these combinations of moderate intensity with extremely long duration, which defines the activity and spurs maximum endurance fitness growth.

Power endurance (moves: 12 to 30; intensity 60% to 90%, duty cycle 1 min effort to 2 min rest) workouts are can include 6 sets of 20-26 hand moves, at intensity high enough to prevent resting, organized in rapid 1 min on / 2 min off duty cycles.  While power endurance challenges are encountered in the context of climbing, they are not repeated sufficiently, nor are they organized into a series of duty cycles with only two min of rest between each 1 min of activity.  Thus the adaptive response is limited as climbers instead seek to maximize their chances of success on a particular route.

Finger strength (moves: 3 to 7, intensity 55% to 80%)  is best cultivated through hangboard workouts, organized around grip type, and with multiple sets of brief repetitions (7 seconds) separated by briefer (3 second) rests.   These workouts allow climbers to reach muscular fatigue for particular grip types in 5-7 reps, which maximizes adaptive response while minimizing risk of injury, unlike in route situations in which randomly encountering a grip type may be in a single repetition and near the climbers limit.

Limit bouldering and campusing (moves 1 to 5; intensity 80% to 100%) are the best ways to cultivate power, which is instantaneous application of finger strength.  This is best trained on comfortable consistent grip types over a short range of 1 to 5 moves.

There are at least three reasons that systematic training can spur greater amounts of adaptive fitness response than simply bouldering and climbing for fun.

  1. Routes are too arbitrary. Arbitrary selections of holds, intensities, moves, and durations do not inspire as strong of an adaptive response from the forearm muscles.  
    1. Most routes include a wide range of hold types, intensities, and durations.  This reduces the chance for systematic fatigue in any one set of forearm muscles.  
    2. Route challenges will seldom match climbers specific training level needs.   The four different dimensions of forearm fitness are responses to different types of climbing challenges, and for any climber, these will require particular combinations of hold intensity, duration, and variety.  Most outdoor routes and problems are just too idiosyncratic to be effective training vehicles for general fitness goals (though parts of routes can be selected for fitness training).
      1. It is possible to use outdoor routes as training resources, but most climbers tend to treat all outdoor routes as performance tests, rather than as a means to cultivating particular types of fitness (see 3 below). 
  2. Routes are too limited in any one dimension.  Systematic training includes combinations of durations, intensities and hold types that are more extreme and are intentionally specific to types of climbing fitnesses. 
    1. Hangboard workouts focus effort on repeated, controlled loadings of the exact same muscles until those muscles fatigue to failure.  Routes will seldom have repeated grip types to specifically fatigue forearm muscles to failure in a systematic, progressive way.   
    2. Power-endurance workouts are tailored to generate and sustain intense forearm pump thought a series of numbered moves, and are repeated before full recovery is made.  Bouldering for fun would remain more performance than training oriented.  
    3. ARC sessions are much longer duration than most climbers encounter in ordinary route and problem completing situations.
  3. Climbing for fun is too focused on performance over process.  Climbers who only climb for fun tend to focus on their strengths and leave gaps in their training procedures, such that certain types of fitness are insufficiently cultivated.   
    1. Fear of failure or pressure to complete routes can inspire climbers to risk injury or keep them from attempting routes that may actually provide the best workout.   Others may continually get on routes that are too difficult, only to spend most of their climbing time hanging at the next quick draw.
    2. Everyday climbing can encourage climbers to stay in the comfortable middle ground of challenge.  For instance, it is easy to meet climbers who have been climbing for fun, but have never put in a session of ARC climbing with more than 100 moves in a row.  Correspondingly, these climbers are unable to rest and recover effectively on routes.   
    3. Other climbers might climb in extremely static styles, and will have insufficient power and lack the neuromuscular habits of efficient deadpointing, and "go-for-it-ness" that they use in campusing or limit bouldering.

Tuesday, May 13, 2014

A foundation for ongoing improvement


The Rock Climber's Training Manual shipped in early April.  I had decided to pre-order it, based on the valuable insights that the Anderson brothers had already shared on their blog.  I find it to be the most important climbing training publication since "Performance Rock Climbing"  because it expands and extends principles of improvement and periodization of climbing training to maximize performance.

Most crucially, as a parent with a busy work schedule, I am glad for the patient and long term perspective that it advocates and the fact that the authors themselves are middle aged climbers who manage to balance careers, families and a dedicated training and climbing system.  Reading the chapters has also helped me identify my priorities in terms of climbing goals and ways to organize my training, practicing, and climbing time.  I wish I would have had access to this book when I was younger, but, I am am glad that at least I can benefit now.

If I were to oversimplify, here are several big picture principles I draw from this book:

  1. Articulate what you want to enjoy from climbing and how you want to improve in order to enjoy those dimensions more:  Personally I am most motivated to improve at my capacity to climb gymnastic, overhanging sport routes.  I want to be able to travel to crags and enjoy the best of the gymnastic sport routes that I can find, and especially, to be able to enjoy the world class gymnastic routes at local areas like the Red and New.  
  2. Identify concrete short term and long term goals:  I articulate my goals elsewhere, but the Anderson brothers are correct to emphasize that working towards specific goal routes is much more motivating and valuable than simply working to improve or to climb a certain grade.   Apollo Reed is a brilliant route, and if you are inspired to climb it, you can quickly deduce how you need to become stronger and wiser in your climbing.
  3. Tailor your training and practice towards achieving your goals, given your current capacities and weaknesses:   Currently, my limiting factors are endurance and power endurance.  Once I know that, I can work to elevate all of my performance areas, but concentrate extra attention on climbing medium intensity for long time periods (20 to 40 minutes) and high intensity for 20 to 30 hand movements with no rest.  
  4. Be patient:   You will need at least a minimal level of patience if you divide your year into three climbing seasons, and specify the last month of each season as your time to focus on performance on outdoor routes.  If you also recognize that slow steady improvement is the only type of sustainable progress then you will not be in a rush to "climb harder".  Instead you see that improving is one of the great joys of any athletic pursuit, then you need to savor and enjoy the moments of progress.  The joy is in the journey, not the end result.  
  5. Progress results from training when focused, consistent, and progressive.  Therefore, careful documentation of both objective dimensions, and subjective experience are key to making continual, incremental adaptations to the demands of training.  A good dose of bureaucratic record keeping and self monitoring go a long ways towards both motivating effort and achieving progress.  
  6. Take time to cultivate all four of the relevant dimensions of fitness for the forearms/fingers.  Ultimately, the limiting factor for most climbers and climbing is defined by capacities in endurance, strength, power, and power endurance of their fingers / forearms.  The body increases capacities in these dimensions by responding to particular combinations of effort, duration, and rest.  Reflecting carefully on how you currently climb / train, will help show you what is missing.   

In addition to finger strength, other areas of strength need to be developed, and technique needs to be refined and practiced, but these can be integrated into the larger program of developing those forearm capacities. A good fitness plan for climbing addresses 6 key areas:

General bodyweight fitness and flexibility:  climbing involves moving and supporting the body through three dimensional spaces.  Secondary and antagonistic (relative to primary climbing related) muscles of the body should be trained to some minimal level of fitness to support this and to add general athletic capacity.   These can be accomplished either through weights, or better yet, through body weight exercises, including progressions related to:  pushups, dips, L-sits, handstands, and some integrated lower body work like squats (in the lower body especially, strength without hypertrophy is advantageous for climbers).   Flexibility work with yoga, stretching, and foam rolling are key especially for older climbers.  All of these can be pursued on rest days from climbing / training.

Climbing specific bodyweight fitness:   climbing is mostly about pulling your core up and in.  Increasing strength at progressions related to pull ups, inverted rows, and core strength progressions like hanging leg lifts, front levers, and plank are key.  Depending on the climbing related trainings, these can be added to more climbing specific work.

Finger / Forearm ARC/MSS Endurance Or, in words, Aerobic Recovery and Capilarity / Maximum Steady State describe fitness related to the capacity to exert low to moderate levels of effort with the forearms for extended periods of time.  The maximum steady state is the highest level of exertion that a climber can perform without reaching a state of overexertion that requires temporary cessation of effort.  This type of endurance is trained climbing a level immediately at the MSS for long durations of time.  An ARC session might include two to four repetition of 20-35 min periods of constant climbing, where the climber works to maintain/ manage a mild forearm pump.  These long sessions can be integrated with skill work that focuses on small footholds, body tension, finding rest positions, pacing, etc.

Finger strength refers to the amount of weight each hand can support from a given type of hold, and is thus highly specific to hold type and angle of loading.   Performing dead hangs from a fingerboard is the safest and most predictable method for increasing finger strength.   Finger strength defines the upper bound of power that a climber can cultivate, and in general, finger strength should be cultivated earlier in a training cycle than power.  However, since muscle increases strength more rapidly than connective tissue, this strength should be cultivated slowly and should allow sufficient periods of rest where maximum strength is not cultivated.

Finger power is the immediate application of maximum finger strength.  Whatever strength has been cultivated can be tailored towards greater power by encouraging the body to stimulate growth and activation of more of the fast twitch muscle fibers.  Power is enhanced by training brief intense loadings, through either limit bouldering or campusing.  Limit bouldering involves problems of 1, 2 or 3 hand moves that are maximally difficult.  Campusing for power involves 1 to 5 hand movements at maximal difficulty.   Great care should be taken in power training to avoid injury and overtraining.

Finger power-endurance refers to the capacity of the body to sustain high levels of effort for medium numbers repetitions, for instance, the crux section of a route may be composed of 20 moves of near constant difficulty that does not allow resting or shaking out.  Power endurance is produced by short term adaptations of the body to increase the amount of recovery enabling enzymes in the trained muscles.  Thus power endurance should be the attribute that is trained in earnest immediately prior to the performance phase.  Power endurance is trained by performing 20 to 30 high intensity movement sets, with brief rest periods between repetitions.  For instance, develop a 25 move boulder problem where every move demands an effort of 80% or so, or is intense enough that resting / shaking out is not possible.  Repeat that problem 6 times with just 2 min of rest between each repetition.  


Periodization of training cycles.   You can't train all of these things at once.  But thankfully, they can be cultivated in turn, during different training periods.   Each of these time periods can include climbing for fun or training outdoors as well, but the available training time for climbing should be focused on the types of workouts that cultivate that dimension of climbing fitness.   Here is an example 16 week season.

Week 1    Rest.
Week 2    ARC/MSS     (2-3 bodyweight sessions can be integrated throughout each period)
Week 3    ARC/MSS
Week 4    ARC/MSS  + Finger strength
Week 5    Finger strength
Week 6    Finger strength
Week 7    Power
Week 8    Power
Week 9    Power
Week 10  Power endurance
Week 11  Power endurance
Week 12  PE / Performance
Week 13  Performance
Week 14  Performance
Week 15  Performance
Week 16  Performance


Thursday, April 24, 2014

Updated COAD area bouldering map

This map shows the approximate location of notable bouldering areas between the southern terminus of Copperhead Ridge on the west, and Crumley Ridge to the east. Most of this area falls inside the Cucumber Tree drainage, and is accessed by parking at the Cucumber Tree Connector Trailhead at the end of the street across from the main access to Walmart.

Getting there:  take East State Street to the east from 33.   Turn left on the road that has a traffic light and leads to Walmart on the right.   The OU credit union is on the left side of East State Street, but will be on your right once you turn onto that road and head north.   You will pass some trailers, a house on the right and come to a small (8 car) parking area next to a small barn.  The trail leads up the drainage from there. After 10 min it comes to an intersection with a footbridge on the left.   Cross the footbridge to the left and then stay left on the main trail for about 10 min.   You will pass the emerald in the woods (down hill 50 feet from the triangular trailside boulder) to the left and then turn the corner to the COAD boulders.  The dark green line on the map marks the trail.


1. The  COAD boulders are on the western side of the south end of Copperhead ridge.    This wall has a host of moderate face problems, which are better after you sweep them off, and would be more fun if the down climb was more pleasant.  There are a bunch of decent problems here, most notably the 3 star boulder which is clean and solid.


2. The emerald is a bit downhill from the eastern flank of Copperhead ridge, just downhill from the large triangular boulder, see location on map above.


3. The lions head wall is at the top of the basin, and is best accessed above, just off of the Athens trail near the juncture with the Basswood Connector.  This wall has a great V0 warm up, high ball that you should probably just downclimb.  To the right of the warm up you will find a couple of pocket starts, then a crimpy V10 well to to the right.


4. The sun cave is a shallow rock house is east of the lion's head, and is clearly visible from there and from the major U bend in the Rockhouse trail.  These problems are marginal in terms of rock quality except for a couple of easy slabs on the right.  The problem (and pictured here)  in the linked post is a fun slab on the righthand edge of the rockhouse.


4.5  Upper tier  at about the location of the B in Boulder Cove on the map above is this tall, very easy and well featured boulder problem. A sit down start adds to the fun.  There are a few more moderate problems nearby.  This area at the top of hill, well above the main cliff line to the left of the commitment area.  
5.  The commitment area is uphill from another major bend in the Rockhouse trail, marked by a low wooden bridge.   Just as you cross the small wooden bridge, this area is uphill on the left side of the small drainage.  Bring brooms to sweep the topout.  Commitment is on the left side, while birdsnest is on the right and is a great steep V4/V6+ with a solid pinch rail.


6.  Big momma and several other features mark the left side of the Rockhouse trail.  Big Momma is the striking tall arete on the cliff line.


7. The boxcar boulders are downhill from Big Momma.  This is the best of the three large boulders with some good warm ups, a traverse, and some eliminates.


8. If you continue walking on the main trail to the south east you encounter an obvious trail-side corner cliff with several problems.  The crimpy corner problem marks the next major turn in the trail, with several small problems nearby.

9. There are some scattered cliffs of mixed quality between crimpy corner and the min-twinkie.  The mini- twinkie is high on the ridge after a fair bit of hiking.  The uphill side has a great moderate overhanging problem with solid pockets on an overhang, a rare Athens treat.


10.  Pass a break-down and several small features around the southern end of Crumley Ridge for the sunken boulder, overlooking the Athens Mall to the east.

Wednesday, May 15, 2013

Lion's Head Wall


So, this is the lion's head on the left hand side of the lion's head wall.  The rock is some of the most solid and featured in Athens county.  A tall V0 ascends under the lion's head and to the immediate right. I typically climb up to the lion's head, traverse a couple feet and then downclimb.   The topout is high, committing, sloping, and not necessarily clean.  Here is a view of the wall:


Detail of the right hand side.   A fun and not too hard problem (V2?) starts matched on the low pockets and heads up to the two sets of spooky eyes.   A harder eliminate starts on the low pockets, then avoids the pockets by grabbing a thin crimp, and follows a series of edges straight up to the jugs above. (V5/6?)  The first crimp is fragile, so treat it with care. The far right side has a very hard and very thin problem (apparently a visiting climber completed that problem in recent years at V10).  An undone project starts on the V5/6 and follows the row of small edges right to meet the topout of the V10.


Wednesday, May 1, 2013

Fun moderate problems with Anna

The right hand side of the sun cave has two fun little slab problems.  The most interesting is this line and follows a brief ramp/seam to a horizontal with an undercling. 


Anna gets ready to try the fun, technical slab / ramp.  


Thin holds!


Friday, February 8, 2013

Running out of space. . .

(I thought I was)
Starting to run out of space for more holds.

Winter (2012/13) I added about 60 new holds (mostly homemade, or found at Lowes).  The good news about running out of space is that you don't need to get or make more holds for a while.  I suspect that I can fit in another 100-150 holds, mainly on the roof and around the edges of wall.  Here is what I added during that winter:
  • White pvc pinches and handlebars with endcaps.   These giant holds are comfortable, cheap, and easy to make.   For pinches you just bolt a capped section of pvc to the wall (into the supports behind the plywood).  For jugs you include a spacer to allow full hand access.  You can either add sandpaper discs, or you can sand the surface to create a better grip.   In some cases I bolt into a t-nut on one end, in others I use lag screws for both ends.  Grey pinches without endcaps were generation #1, white with endcaps were generation #2.  


  • Small pvc endcaps and T joints screwed directly to the wall  [about 35 cents each)
    • These make fine generic feet for traverses and warm ups.
    • Cutting footholds from strips of oak molding is cheaper, but requires more work.
    • These you just pre-drill holes for the screws and then attach them to the wall


  • Squarish wooden pinches made from double layers of 2X3s.  
    • I glued and clamped two 4ft sections of 2X3s
    • Made an angled cut to create 7 hold sized chunks
    • Smoothed corners with a rasp and chisel
    • Sanded with an orbital sander
    • Countersunk screw-holes


  • Wooden side-pull jugs
    • Used left-over 6 X 3/4 pine slats, glued and clamped into staggered layers
    • Attached angled molding on the ends
    • Smoothed functional surfaces with orbital sander
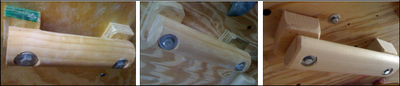
    • Need some detail shots, but the hold in question is the long wooden hold attached with several screws.  

  • Mini jugs, made by modifying holds from Atomic (on sale seconds)
    • Used hand saw to make incut edge


Monday, May 7, 2012

Potential for a line or two


Went for a rainy day hike a couple of weeks ago.  A sit down start on the lip jug on the left, then angling up and right has potential.  Sadly the cool feature on the right of the big hueco is not solid enough.  It would otherwise be  very interesting.


Monday, March 1, 2010

PVC pinches FTW

I bought two 10ft sections of PVC (3.5 and 2.5 inches), each for about eight bucks at Lowes. I also bought a corner piece of 3.5 for five bucks. I cut them to various lengths with a circular saw, and pre-drilled holes for bolting them up. I used a combination of standard bolts into T-nuts, lag screws and drywall screws to attach them. The holds will flex a bit under load, but so far they seem plenty durable. Notice the extra large washers, and how we stacked the washers to get contact in a wide area. I can’t imagine tearing through the pvc on such large of an area. If someone can exert that much force on a 3.5 inch tube, pulling down on a ceiling they should try out for the role of Mr. Incredible.

Texture is provided by 6 inch, 180 grit, self adhesive sandpaper discs. So far, the discs have stuck admirably well, with the exception of on the curved piece, where the shape prevents us from having sufficiently wide sections. On that section the paper slowly slides down under full load. Another potential shortcoming is that it is likely that the adhesive is temperature sensitive, and might not work very well in the summer. For wintertime bouldering in our garage we seldom have the heat on high enough to worry about the adhesive softening up.
The pipes are a great asset in terms of hold type and in their “feature-ness”. It is great to have a 5ft pinch rail crossing a section of the roof. It allows a more Hueco-type feel for many of the problems, where beta depends on where you choose to use the hold, rather than which hold to use.
I am sure that heavy climbers or extreme dynos could lead to hold failure in gym conditions—but I doubt we will have problems in a home wall, especially because our low ceiling precludes dynos of any size. Obviously—we don’t grab the sharp ends of the pipes. Another reason these holds are good for home walls but not so much for gyms, where you can’t trust folks not to do foolish things.

How are they to use? Effort is very dependent on body position, the closer to the center of your body the harder it is to use the thumb effectively. In cramped quarters they can be a bit tweaky. Gripped wider than shoulder width they feel great—challenging and non injurious. Using the holds builds pinch capacity pretty quickly. During the first week the section on the 60 degree wall seemed desperate, and now it is pretty casual.

Thursday, February 25, 2010

Handle bars from hand rails


Whatever your budget for holds, you will always want more. So, how can you get some standard work horse holds on the cheap? Mass production with wood. Of course, available materials make certain holds easier to make with wood than others, and because of the expense of ‘real holds’ made from plastic, the holds we most want to make for cheap are the ones that are least interesting and most expensive: Jugs.
Basically, you will need to make two types of jugs: handle bar rings and directional jugs. We made three slightly different handle bar rings.

(1) partial hand rings (2) full hand rings (3 matching handlebars
The design for all three handle bar styles is basically the same: a chunk of handrail between 6 and 14 inches in length, a spacer at each end, and counter sunk holes for lag screws or standard bolts at both ends.
Lowes has round (pine) and oval (poplar) handrail. Both seem plenty strong enough for the task. It comes in multiple lengths; I have tended to use 10ft lengths, the most that will fit in our van. Avoid knots and warped sections.
(1) For the partial hand rings I used a single layer of 3/4 inch plywood cut into small rectangles. This means that adults can not get their full hands around the rings, while kids can. (round pine)
(2) The full hand rings have double layers of plywood and are plenty roomy to get a super juggy grip. (round pine)
(3) Monster matching handlebars use sections of 2X3s as spacers and the oval poplar hand rails.
Mass production Steps:
  1. Clamp the handrail, mark lengths with a pencil.
  2. Near each section end drill the counter sink holes (~one inch flat bit).
  3. Use circular saw or hand saw to cut lengths along pencil marks.
  4. Cut spacers from plywood, molding or 2X3s.
  5. Sand corners of handrail and spacers with a disc sander (clamp drill in table).
  6. Glue spacers to handrail ends with wood glue, clamp with weights for a couple hours (ideally leave them overnight).
  7. Drill holes for lag screws or bolts slightly larger than the hardware.
  8. Fit washers and bolt to t-nuts, or drive lag screws through the wall surface and into the framing.
SAFETY NOTE: make sure that both ends are either in a t-nut or lag screwed fully into the 2X6 framing. This limits the location options, but this is not such a problem since these holds are mainly just random jugs for warm ups and beginner problems.

Wednesday, February 24, 2010

More Mojo in your Dojo


How can you get the most out of your home bouldering wall while keeping plenty of extra cash for other key climbing supplies, like chalk and beer?

Mass production of standard holds. Over the next several posts I am going to write up some strategies I have used to get more climbing potential out of our home bouldering wall. Later I might write up some posts about wall design and construction. For now, let’s focus on holds, and three principles to guide us:

1. The more the merrier. Ideally, every available space for a hold will be filled. You want to take full advantage of the space you have constructed.

2. Diversity is good. You want to have a wide array of hold types and sizes to maintain interest and stretch your imagination.

3. Consistent distribution. You want a variety of hold types in all parts of your space, so that hard, medium, and easy problems can cross all areas of the wall.


When do you have enough holds? When you can no longer fit any more holds on your wall. Our dojo is not there yet. Check out this shot.

The prime climbing area on the 30 degree wall is mostly filled with holds. We can squeeze a couple more around the edges, and we need some small footholds added throughout, but besides that, the area is pretty well filled. Notice the hold diversity. We have made an effort to spread small, medium and large holds; downward pulling edges, sidepulls, underclings and pinches; as well as vary how positive the holds are, though we have few true slopers because they take a lot of space and are hard to make at home. The distribution of types is pretty consistent, though at the edges we have placed more of the ‘likely to be used in that spot holds’.


In contrast, check out the relatively sparse distribution in the “kids” area, with the near vert walls and roof. Density could easily be doubled here. Also note that while the slabs hold some variation, the roof defaults to jugs, especially handle bars. The simple reason for this is access, we make the whole wall accessible to the widest range of abilities that we can. Clearly, we have room for improvement. We need more medium and small holds, more directionals, complex shapes, and footholds in this area.

Gym climbers may debate which hold manufacturer is best: SoIll, Etch, Pusher, Metolious, Straight Up (from long ago). But for the home climber, these companies are nice, but none of them can compare to Lowes or Home Depot when it comes to price.


Tuesday, February 2, 2010

The Dojo

The Dojo in Spring 2014

Since these photos were taken I have added two sets of Kilter holds, moved several of the holds from 50 degree wall and on to spaces where they are more available for traversing.  I also added some footholds to make better rest stances at both ends of the room and on the pillar in the middle.
Finally, I build the campus board downstairs.


The Dojo in Winter 2010.

Wet and cold have kept us indoors. Thankfully, I have had time to make improvements to our bouldering dojo, including new carpet and some new holds, including the newly minted PVC roof route.

Here is a detail on one of the little holds we added recently. Pumpy. Standard 3.5 inch PVC with 180 grit glue on sanding discs. This section is about 5 feet long, with intermittent patches of texture.


Here is a section demonstrating current hold density in one section.