Friday, December 3, 2010

Open hand training holds

1.  Finger bucket for 30 degree and steeper walls.


2. Wider version of same design, placed on roof section.
While reaching up and out from the 30 degree wall below
this type of hold makes a challenging open-hand match.

3.  Same design, but made with round hand rail for 'slabbier' walls.
Rail is flush with backing to make deeper,
comfortable open-hand edge.

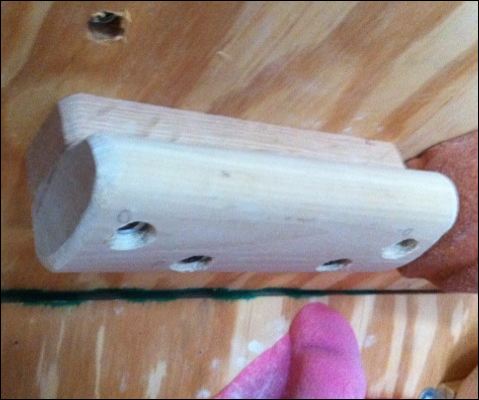
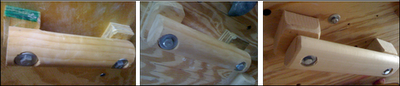
4.  Open hand training hold, with thin rail. 
This design uses a pine 2X3, with one corner ripped off;
plus a thin oak molding.

5.  I made about 10 of these open hand trainers to create 
a mini system wall in the kids area of the dojo.


All of these holds are basic edges that are intended to be installed semi-permanently at particular angles, and with one face up.  This is a good solution for home walls because such simple designs are easier and faster to make than general purpose holds, and they can fill in space around the bolt on holds.  While basic edges are "boring" they are the most common type of hold, especially on sandstone, and are a great resource for training.

The last type of the training hold [image 4. above] brings up a couple of general points about hold layout.   In a home wall, you should create spaces that allow you to train in different ways.  The last image shows a small section of slightly overhanging wall above a small angled roof.   This a great place to work on hanging slopers, but thin edges are hard to use here because holds immediately underneath can obstruct access the thin edge or impinge on your forearm.

Placing the thin edge on the face of the sloper means that you can still access the thin edge even with a more bulky hold immediately below it.  Plus, an array of these training holds let you practice similar movements from both sloping and thin open-hand edges.

Thursday, November 25, 2010

Mass produce home-made holds

Crude illustration shows profile of hold; 12 ft sections; 
and series of three sets of pre-drilled holes.


Home bouldering walls always need more holds.   One solution is to mass produce some basic shapes, and then introduce slight variations to them while you create.   Here is a great design for medium size edges or "finger buckets".  I make extensive use of versions of this hold on our 60 degree and 30 degree walls.   The idea here is to make two to three dozen holds at once.

Example of mass produced "finger bucket"

Materials:
  1. One 12 foot section of oval hand rail, like that pictured in the hand rail jug photos.
  2. One 12 foot section of narrow rectangular oak molding (as narrow as the flat bottom of the rail.)
  3. Wood glue
  4. Drywall screws, small washers
Tools:
  1. Large table clamp or "Work Mate" type work table.
  2. Small clamps or weights to press the sections together
  3. Electric drill, with bits sized for hole and countersink
  4. Sanding disc for drill (coarse grade)
  5. Circular saw
  6. Protective eye wear

Set up and Glue: 
The oval hand rail should have a flattened bottom side.   Line this side up with the molding, and make sure that you think about which side will be the "functional" side of the hold.   These are meant to be generic downward pulling edges, so, line up the two pieces of wood so that it will make a lip that will be comfortable to use on your wall surface.  The molding acts as a spacer that provides room for your fingers to grasp the edge of the handrail.   I chose to vary overhang from one end that is nearly flush with the edge of the moulding to about a centimeter of the flat base exposed at the other end.  

Spread glue along the length, wipe it smooth, and clamp or press the two boards together along their length.   Let the glue set overnight or at least several hours.  

Mark and drill:
With a pencil, mark your cut points.  I varied the sections from 3 to 6 inches in length.  Mark the short sections with three screw holes (two on the functional side one on the other).   I use 4 screws on the 6 inch matching edges.   Make sure all of your holes will pass through both pieces of wood.  I missed with several, and had to re-drill.

Clamp the beam of wood in your table clamp. After you have marked all of your drill holes, attach your drill bit for the counter sink hole, which should a flat spade type bit that is slightly wider than your small washers.   Drill all of the counter sink holes, then all of the actual holes, BEFORE your cut the glued beam into sections.    Inspect your drilled holes to make sure they come through the base on the back, they are fully drilled.  Always  chose a hole width greater than the width of the screws so you can just slide the screws into the holds.  

Cut and sand:
Put a card board box under the end of the beam.  Saw the hold sections off into the box, adjusting the beam in the clamp so that a bit overhangs the edge of the table as you go.  

Put the sanding disc on your electric drill (corded) and clamp it in the table clamp-- basically a cheap version of a table disk sander.  Take the holds one at a time and (using the section of the disc that rotates away from your body) sand off any sharp edges that might be touched during use.  Modify the usable edge of the hold as you see fit.   


Thursday, November 11, 2010

Perfect Fall Conditions


Athens boulderers have enjoyed perfect fall conditions during November.  This photo is from a recent family hike to the COAD area.   The "Wood Chimes" sculpture (author unknown) was installed this fall near the intersection of the Rock House Trail and the Cucumber Tree Connector.

Tuesday, March 9, 2010

Home made climbing holds


Here is a list of posts about making home made holds:

NOTE:   see DIY holds and walls page.  
  1. Our wall
    1. Updated
  2. Overview of hold making
  3. Handle bars
  4. PVC pinches
  5. These are all on the same page:
    1. PVC Handlebars and pinches with endcaps
    2. PVC cap footholds
    3. Doubled 2X3 pinches
    4. Directional jugs from layered slats

More to come.

Sunday, March 7, 2010

Perfect Conditions

Perfect conditions: for a leaf fight! The trails are muddy in the spring, but Athens bouldering is coming back to life.

Monday, March 1, 2010

PVC pinches FTW

I bought two 10ft sections of PVC (3.5 and 2.5 inches), each for about eight bucks at Lowes. I also bought a corner piece of 3.5 for five bucks. I cut them to various lengths with a circular saw, and pre-drilled holes for bolting them up. I used a combination of standard bolts into T-nuts, lag screws and drywall screws to attach them. The holds will flex a bit under load, but so far they seem plenty durable. Notice the extra large washers, and how we stacked the washers to get contact in a wide area. I can’t imagine tearing through the pvc on such large of an area. If someone can exert that much force on a 3.5 inch tube, pulling down on a ceiling they should try out for the role of Mr. Incredible.

Texture is provided by 6 inch, 180 grit, self adhesive sandpaper discs. So far, the discs have stuck admirably well, with the exception of on the curved piece, where the shape prevents us from having sufficiently wide sections. On that section the paper slowly slides down under full load. Another potential shortcoming is that it is likely that the adhesive is temperature sensitive, and might not work very well in the summer. For wintertime bouldering in our garage we seldom have the heat on high enough to worry about the adhesive softening up.
The pipes are a great asset in terms of hold type and in their “feature-ness”. It is great to have a 5ft pinch rail crossing a section of the roof. It allows a more Hueco-type feel for many of the problems, where beta depends on where you choose to use the hold, rather than which hold to use.
I am sure that heavy climbers or extreme dynos could lead to hold failure in gym conditions—but I doubt we will have problems in a home wall, especially because our low ceiling precludes dynos of any size. Obviously—we don’t grab the sharp ends of the pipes. Another reason these holds are good for home walls but not so much for gyms, where you can’t trust folks not to do foolish things.

How are they to use? Effort is very dependent on body position, the closer to the center of your body the harder it is to use the thumb effectively. In cramped quarters they can be a bit tweaky. Gripped wider than shoulder width they feel great—challenging and non injurious. Using the holds builds pinch capacity pretty quickly. During the first week the section on the 60 degree wall seemed desperate, and now it is pretty casual.

Thursday, February 25, 2010

Handle bars from hand rails


Whatever your budget for holds, you will always want more. So, how can you get some standard work horse holds on the cheap? Mass production with wood. Of course, available materials make certain holds easier to make with wood than others, and because of the expense of ‘real holds’ made from plastic, the holds we most want to make for cheap are the ones that are least interesting and most expensive: Jugs.
Basically, you will need to make two types of jugs: handle bar rings and directional jugs. We made three slightly different handle bar rings.

(1) partial hand rings (2) full hand rings (3 matching handlebars
The design for all three handle bar styles is basically the same: a chunk of handrail between 6 and 14 inches in length, a spacer at each end, and counter sunk holes for lag screws or standard bolts at both ends.
Lowes has round (pine) and oval (poplar) handrail. Both seem plenty strong enough for the task. It comes in multiple lengths; I have tended to use 10ft lengths, the most that will fit in our van. Avoid knots and warped sections.
(1) For the partial hand rings I used a single layer of 3/4 inch plywood cut into small rectangles. This means that adults can not get their full hands around the rings, while kids can. (round pine)
(2) The full hand rings have double layers of plywood and are plenty roomy to get a super juggy grip. (round pine)
(3) Monster matching handlebars use sections of 2X3s as spacers and the oval poplar hand rails.
Mass production Steps:
  1. Clamp the handrail, mark lengths with a pencil.
  2. Near each section end drill the counter sink holes (~one inch flat bit).
  3. Use circular saw or hand saw to cut lengths along pencil marks.
  4. Cut spacers from plywood, molding or 2X3s.
  5. Sand corners of handrail and spacers with a disc sander (clamp drill in table).
  6. Glue spacers to handrail ends with wood glue, clamp with weights for a couple hours (ideally leave them overnight).
  7. Drill holes for lag screws or bolts slightly larger than the hardware.
  8. Fit washers and bolt to t-nuts, or drive lag screws through the wall surface and into the framing.
SAFETY NOTE: make sure that both ends are either in a t-nut or lag screwed fully into the 2X6 framing. This limits the location options, but this is not such a problem since these holds are mainly just random jugs for warm ups and beginner problems.

Wednesday, February 24, 2010

More Mojo in your Dojo


How can you get the most out of your home bouldering wall while keeping plenty of extra cash for other key climbing supplies, like chalk and beer?

Mass production of standard holds. Over the next several posts I am going to write up some strategies I have used to get more climbing potential out of our home bouldering wall. Later I might write up some posts about wall design and construction. For now, let’s focus on holds, and three principles to guide us:

1. The more the merrier. Ideally, every available space for a hold will be filled. You want to take full advantage of the space you have constructed.

2. Diversity is good. You want to have a wide array of hold types and sizes to maintain interest and stretch your imagination.

3. Consistent distribution. You want a variety of hold types in all parts of your space, so that hard, medium, and easy problems can cross all areas of the wall.


When do you have enough holds? When you can no longer fit any more holds on your wall. Our dojo is not there yet. Check out this shot.

The prime climbing area on the 30 degree wall is mostly filled with holds. We can squeeze a couple more around the edges, and we need some small footholds added throughout, but besides that, the area is pretty well filled. Notice the hold diversity. We have made an effort to spread small, medium and large holds; downward pulling edges, sidepulls, underclings and pinches; as well as vary how positive the holds are, though we have few true slopers because they take a lot of space and are hard to make at home. The distribution of types is pretty consistent, though at the edges we have placed more of the ‘likely to be used in that spot holds’.


In contrast, check out the relatively sparse distribution in the “kids” area, with the near vert walls and roof. Density could easily be doubled here. Also note that while the slabs hold some variation, the roof defaults to jugs, especially handle bars. The simple reason for this is access, we make the whole wall accessible to the widest range of abilities that we can. Clearly, we have room for improvement. We need more medium and small holds, more directionals, complex shapes, and footholds in this area.

Gym climbers may debate which hold manufacturer is best: SoIll, Etch, Pusher, Metolious, Straight Up (from long ago). But for the home climber, these companies are nice, but none of them can compare to Lowes or Home Depot when it comes to price.


Tuesday, February 2, 2010

The Dojo

The Dojo in Spring 2014

Since these photos were taken I have added two sets of Kilter holds, moved several of the holds from 50 degree wall and on to spaces where they are more available for traversing.  I also added some footholds to make better rest stances at both ends of the room and on the pillar in the middle.
Finally, I build the campus board downstairs.


The Dojo in Winter 2010.

Wet and cold have kept us indoors. Thankfully, I have had time to make improvements to our bouldering dojo, including new carpet and some new holds, including the newly minted PVC roof route.

Here is a detail on one of the little holds we added recently. Pumpy. Standard 3.5 inch PVC with 180 grit glue on sanding discs. This section is about 5 feet long, with intermittent patches of texture.


Here is a section demonstrating current hold density in one section.


Sunday, January 10, 2010

Winter Bouldering


The conditions are not ideal. We got in a couple of good days in early December, but since then the Athens area has been too cold and snowy for fun bouldering. We have gone exploring in and around Stroud's run, but have only found a few mediocre formations. We had plenty of fun hiking though.