Whatever your budget for holds, you will always want more. So, how can you get some standard work horse holds on the cheap? Mass production with wood. Of course, available materials make certain holds easier to make with wood than others, and because of the expense of ‘real holds’ made from plastic, the holds we most want to make for cheap are the ones that are least interesting and most expensive: Jugs.
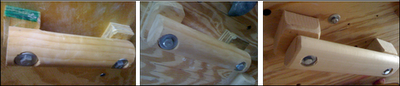
Basically, you will need to make two types of jugs: handle bar rings and directional jugs. We made three slightly different handle bar rings.
(1) partial hand rings (2) full hand rings (3 matching handlebars
The design for all three handle bar styles is basically the same: a chunk of handrail between 6 and 14 inches in length, a spacer at each end, and counter sunk holes for lag screws or standard bolts at both ends.
Lowes has round (pine) and oval (poplar) handrail. Both seem plenty strong enough for the task. It comes in multiple lengths; I have tended to use 10ft lengths, the most that will fit in our van. Avoid knots and warped sections.
(1) For the partial hand rings I used a single layer of 3/4 inch plywood cut into small rectangles. This means that adults can not get their full hands around the rings, while kids can. (round pine)
(2) The full hand rings have double layers of plywood and are plenty roomy to get a super juggy grip. (round pine)
(3) Monster matching handlebars use sections of 2X3s as spacers and the oval poplar hand rails.
Mass production Steps:
- Clamp the handrail, mark lengths with a pencil.
- Near each section end drill the counter sink holes (~one inch flat bit).
- Use circular saw or hand saw to cut lengths along pencil marks.
- Cut spacers from plywood, molding or 2X3s.
- Sand corners of handrail and spacers with a disc sander (clamp drill in table).
- Glue spacers to handrail ends with wood glue, clamp with weights for a couple hours (ideally leave them overnight).
- Drill holes for lag screws or bolts slightly larger than the hardware.
- Fit washers and bolt to t-nuts, or drive lag screws through the wall surface and into the framing.
SAFETY NOTE: make sure that both ends are either in a t-nut or lag screwed fully into the 2X6 framing. This limits the location options, but this is not such a problem since these holds are mainly just random jugs for warm ups and beginner problems.