Friday, December 12, 2014

Hangboard Cycle Winter #1


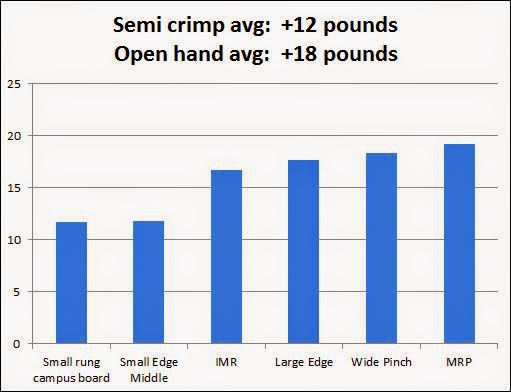
On December 11th I completed my sixth and final HB workout for my first cycle of strength training for winter of 2014/2015.   In fall I did 10 second max weight hangs, and felt that regime raised my overall strength well it also felt as though I was better prepared for brief cruxes than for sustained routes.  

I will start power training this weekend, and then rest over Christmas, and then start another strength and power series after that.   I was feeling especially strong on my 6th session, and if I did not have a compressed schedule I feel like 2-3 more sessions would have allowed me to continue to progress.  However, I want to take advantage of the holiday down time and will return to these same grips in late December.

Missing from the chart above is an 8th hold that I was using as a litmus test for power training, the medium campus rung.  My sixth session I held a 7.5 reps at body weight, and so will begin that grip adding some weight in my next cycle.  At the start of this cycle I had no trouble hanging that edge for the first couple reps, but could not complete the fifth repetition.

Power endurance, or strength endurance on good crimps while holding a high proportion of body weight will be my training focus for the coming cycles.  A goal route for spring is Tuna Town, and many of the holds on that route are solid, full pad crimps that activate the thumb in a semi pinch.

Saturday, November 22, 2014

Learning to shape with foam


Super big thanks to Ian Powell for giving me my starting foam.  :-)   !!!!  I am glad that I finally began working with it, though I wish I would have started sooner.  The thing that held me back is that I did not really have a type of hold that I was driven to make.  But, then I got on Tuna Town at the Motherload.   [line with a rope to the left of the rib features]

Turns out that the key challenging holds in the middle section are horizontal pockets that typically are one pad deep, comfortably curved, and include a thumb catch that makes the hold feel better for one hand than the other. 

I need more practice climbing and resting on these types of holds, so I wanted to design some.  
I am going to do several more that have the one pad incut with a thumb catch, and explore different aesthetic variations.  


This particular hold involves an indentation for the right thumb that makes the hold somewhat sequential when placed as a horizontal (because the thumb catch makes the hold noticeably better for the right hand).   This type of hold feels much less secure if you use an open hand grip and are intended for a 30 degree wall (hence my need to cultivate more endurance on these holds). 


Shaping with foam today was a good learning experience but I wish I would have started with a slightly wider chunk of foam-  I don't think I left enough space for the bolt.  In terms of function I wanted to make a hold that puts the pulling direction slightly out of plane from the wall so the incut dished area is closer to the wall on one side than the other.

In terms of aesthetics, I was primarily trying to let the internal form progress in a fluid way.  I ran out of space on the right end, in the second photo above.  I tried adding an inner curve that resulted in two different types of external corners or points.  Inspired by bar-b-q ribs, I tried to make it look as though a section of bone was sticking out from the meat of the hold.   


You can see the thumb indentation, the bone texture that is cut off at angles.  The angled thing would not make a very comfy hand hold, thugy it could make a good pulling surface as a foot.  Hope to make a few more incut one-pad holds with a thumb catch.  


Tuesday, November 18, 2014

Winter plan?


So this is my current plan for the Winter climbing season-- primarily composed of hangboarding, limit bouldering, and campusing arranged in two brief seasons.   This will allow me to start a normal sport climbing training cycle at the beginning of March, with a May/June performance peak.

During this time I will be aiming to spend weekend time developing local boulder problems, or climbing for fun in the dojo, or if possible, visiting the RRG.

Friday, October 10, 2014

Suncave


Quiet afternoon at the Dojo


Working on getting some shots that show the best features of the Dojo.  Need to figure out a better lighting option, though lighting is always tricky to arrange in a bouldering room.  This next shot is fun, but a little bit dim.


This one is even darker, but shows the missing corner of the room from the perspective of the other shots.


Anna working on the "Mercy the Pabst" traverse, above and below.


Sydney cruising around on the 55 degree wall. 


Wednesday, October 8, 2014

eGrips: Sandstone Chips


Best Holds in the Dojo:  Sandstone Chips


Subtle complexity, varied sweet spot location, technique enhancing

In Spring 2014 I set ordered a bunch of hold sets from e-Grips.  Some of the best holds were the smallest ones, the Sandstone Chips which are screw-in jibs.  A home wall can never have too many footchips and these are some of the most interesting and technical footchips I have encountered.

The photo above shows the starting hold:  the Sandstone Chip with blue tape on lower right.  "Blues Clues" is one of the most challenging room traverses in the dojo, and also the most unusual.  The route follows limited feet (blue footchips with tick marks, of which you can see see three in this photo).   The hands are open-- you can use any handhold as long as it is not a handlebar jug or the finishing rail on the edge of the wall.   The footholds on the route are almost entirely from the Sandstone Chips set (there are three Atomik chips and one Vision chip on the route as well).

Because of the Sandstone Chips, the Blues Clues problem creates decision making and route reading challenges as well as forcing close attention to technical feet.


The chip above illustrates the complexity in the holds in this set.  As you approach this hold from the right, with your left foot, the top right hand side presents the best location for your foot.  But, after you pass the hold, the best surface for the right foot is on the lower left.   This level of detail is good preparation for outdoor routes and problems with technical feet.


The chip above is on a 50 degree wall.  It is nicely incut and allows you to match feet, but the small size demands precise placement and body tension to use it effectively.   The fact that it is a screw in allows me to fill spaces between larger holds with the chips, rounding out the array of holds in the dense areas of the wall.  


These two chips illustrate something I love about these footholds-- they are incredibly sensitive to the angle you place them.  Here both holds present their best edges to the side, while the right hand chip offers a technical smear when approached head on.   This means that if you load the hold from the proper direction, with the right type of pressure it is a good hold, but if you don't your foot will skate off the hold.  

Summary:  The eGrips Sandstone Chips are the best foothold chips in the Dojo.  They are subtly complex, which means that climbers who pay close attention to the shape and angle will get much better purchase and leverage on these holds.  Many of them have foot and angle specific sweet spots, which really highlights technical ability.  And finally climbers who work with these footholds will be much better prepared to climb and boulder outdoors where such complex footholds are the norm.  Like all jibs these are compact, but like all best jibs they are screw-ins, which allows me to add them wherever they are needed.  I will certainly get more when I make my next eGrip order.  

Full disclosure:   In 1993/94 I managed the climbing wall program at Miami University, Ohio.  I hired a promising young climber and route setter named Chris Danielson. (what is the deal with me hiring route setters?) Since then, I recently got in touch again with Chris because I was stopping through Boulder.   I ordered all of my sets of eGrips at a slight discount.  We did not discuss the fact that I might be writing hold reviews for the Dojo.   

Monday, October 6, 2014

Kilter Grips: Winter M3 and Teagan M1


The Dojo recently added two sets of grips from Kilter: Teagan Medium #1 (purple) and Winter Medium #3 (green).  Jackie Hueftle suggested these based on the layout of our Dojo, mostly 30 degrees and steeper, but with some near vert sections as well.


Kilter grips overall:    These designs are compact, clean and articulate.  Form follows function and these particular holds are the sorts of directionals that route setters love to find, and hide in their personal bucket so they can be sure to use them on their own routes.  There is no wasted material but there is plenty behind the washer and over the radius of the pulling surfaces.  These holds are excellent for home walls because they are both positive and compact.  I found I could work these low profile holds into small areas between existing holds and not block access to other holds.

Both sets are primarily directional edges that generally offer one nicely formed positive face.  They are versatile in the sense that, as directionals, they will allow you to set sidepull, undercling or gaston movements. In fact, most of these holds feel like they are best positioned as something other than a horizontal.  However, some of the longer Teagans can make very interesting matching edges, should you use them that way.

Winter Medium 3:   These are slightly asymmetrical classic directionals.  They are efficient, low profile, with varied angles on the primary pulling surface.  While I have one or two placed on the steeps most of the others are on 30 degree or less steep walls.  They are best used as sidepull / gastons or underclings.  They are also good as slightly angled edges, as pictured above.  The pulling edges are nicely rounded but with a tighter angle than the Teagans, and the Winter's also present a much more sleek and challenging surface as footholds whenever the pulling surface is not up.  The great strength of the Winter set is their clarity of design, compact efficiency, and ergonomics.  Their value for price is good, but their compact size is even more valuable to me as I run out of wall space.  

Both of the Winter and Teagan sets are great for gym route setting, but it is the Teagans that really excel in the dojo because of their greater distinctiveness and versatility.    


Best Holds in the Dojo:  

The "Best Holds in the Dojo" is a label that I give to particular holds that I identify as having the best combination of attributes for a home training wall.  I have holds from about 8 different manufacturers and I am working to identify the best individual holds or best sets that I use from each of them.  My main focus is to explain how I use the particular holds and why they are so valuable.  Finally, whenever possible, I will try to identify ways that aspects of these holds could be extended and built upon in future designs.


Best Holds in the Dojo:  Teagan Medium Set 1


Nuanced grip positions, comfortable radius, versatile terrain


The Teagan Medium 1's are some of the best holds in the dojo and they inspired me to order several more sets of Kilter holds, including two of the other Teagan sets.  This particular hold from the Teagan M1 set is a star in many of my workouts and it exemplifies the best features of this set.  I placed it on the main path of of my ARC traverse, and I have integrated it into my power-endurance problem.  The distinctive and most valuable dimension illustrated in this grip comes from the combination of the "coral-horn" feature, the comfortable radius and the depth of the space behind the pulling surface of the hold.  As you can see from my hand position you can grab the hold in two ways:  (1) a typical semi-crimp with thumb activated which is standard to any incut directional with a thumb catch (2) a partial open-hand wrap of the index finger with a slightly more relaxed hand position.


These two illustrate the same potential for a partial index finger wrap and slightly relaxed grip.  This shape is innovative because most incut directionals are either clearly better for a crimp grip or an open hand grip.  These, by offering a nuanced combination of both allow careful and attentive climbers to take advantage of either grip that is most advantageous for the given movement.

The left hand image of the two illustrates one way that the design principles behind this set could be extended to make an even more valuable set of holds in the future.   I put three washers as shims behind the left hand hold because it increased the usable space behind the loading surface of the hold.  This makes the hold feel noticeably more positive and my fingertips are less crowded.

Back in the 1990's Pusher would sometimes make special "short pours" of classic holds to allow route setters to vary quality from the expected jug to a shallow surprise.   It would be great if shapes like those in Teagan Medium 1 could have both shallow and "deep pours" varying the depth at which your fingers can get behind the pulling surface.

With plus and minus versions of each of the holds in the Teagan M1 series route setters could really dial in the difficulty while keeping the other attributes of the hold the same (matchability, availability for hand foot matches, etc).  This strategy would work very well with this set because the slightly concave pulling surface is clearly defined on all of these holds, and they they have extremely comfortable wide radius edges.

More Kilter Grips on the way!

I recently payed for an order for 4 more sets from Kilter, including the Teagan Medium 2 and Large 2; and one each from the Noah and Sandstone series.  I am really looking forward to the arrival of those holds!

Full disclosure:  Jackie gave me the two sets review above because she and Ian wanted to get my feedback on them.  Way back in the late 1990's I managed Rock Sport in Reno, Nevada where I hired a promising young climber (Jackie).  I moved to grad school in Seattle, but we have gotten back in touch since then.  This summer my family and I stopped by the Spot for to visit with Jackie, and we got to meet Ian who generously showed us his shaping shop and let us play around with some foam.  

Friday, September 12, 2014

Hangboard Cycle Results


The graph above plots my 10 second max weight hangs from the grips listed at right.  The y axis reports the amount of weight added to the harness or subtracted via pulleys.   The graph shows that extra weight held for 10 seconds increased during the 3 week cycle for all of the grips by some amount between 12 and ~30 pounds, depending on the grip.  Two of the grips I added on the 3rd workout (large edge and crisp crimp) and one grip I skipped one week due to lack of access.  [Note: during this time period my bodyweight + clothes and harness totalled to about 173 pounds]

Further note:  all of these holds are on the Rock Prodigy board, or the standard metolius wood grips campus rung.  See image on this post.

The plot is ok, but it leaves me wondering: "Which grips did I gain the most, and on which the least?  Is there any logic or pattern to the average amount of gains?"

 To answer these questions I calculated the average weight held for the first 6 observations and final 6 observations for each grip, and then calculated the difference between the two.  Then I sorted from smallest to greatest.

I omit the "Crisp Crimp" from the next graph simply because I was not actually maxing out performance on that hold.  I was gripping that edge with a closed crimp and I was treating it extremely cautiously, so I don't think that the change accurately represent a gain in strength.

On the small campus rung and the small edge I was using the "half crimp" grip or semi-crimp.  To try to describe the grip position: the half crimp grip that I use is the pretty standard way of holding a small campus rung, where the pinky and index fingers are open grip, but the middle and ring are only half crimped. The knuckle closest to the finger tip is straight. This allows me to have all four pads on the rung.


The chart is pretty informative, and it raises some interesting questions about how different types of grips are related and how strength gains might be related to both the grips used and the physiology of the athlete.
  • Sorting by change in additional pounds held groups the holds according to grip type.  The first two (small rung campus board and small edge) are both gripped using a semi open crimp.  The next four are all gripped using and open hand grip.   
  • I gained more strength with the open hand grip than with the closed hand grip
    • For every 2 extra pounds in the semi crimp grip I gained 3 pounds in the open hand grip.  50% more progress seems like a big difference (do other people notice a similar difference in their progress?)
  • I might just be me.  Historically I have been stronger on open hand holds and on moves that emphasize larger holds and endurance.
    • Crimps and power on crimps have long been limiting weaknesses
    • One interpretation of this chart is that I gain strength in open hand holds faster because those muscles respond more strongly to stimulus than do those involved in crimping.
    • An alternative explanation is that I was training more holds (twice as many) that relied on open hand rather than semi crimp grips.  
  • One final observation involves the pinky finger
    • With the exception of the MRP hold, both of the semi crimp holds engage the pinky finger more prominently than do the open hand grips. The pinky is by far the weakest finger.
    • It seems possible that a limiting factor of the semi crimp grip is that is loads the pinky more than the open hand grips, and in the semi crimp the two middle fingers are not in the open hand position which has been highly trained in all the open hand hold grips.  
In conclusion, I don't have enough information to know if the patterns I see in these results are completely idiosyncratic or if they might suggest something more general about how the training of related types of holds influence development of strength in related grip types.  It would be great to hear from other climbers who have recorded similar data from their training sessions.


Saturday, September 6, 2014

I love progress!!


I just finished Hangboard workout #6 and I am totally psyched.  My overall workout strategy is inspired by the Rock Climbers Training Manual but this particular use of HB max weight hangs is motivated by Eva Lopez.  I am making progress, and I can see it clearly by comparing my weights and times from just 11 days ago.  The improvements are noted in the day 6 record, in [square brackets],   If  your gym does not have pulleys and weights for systematically increasing hangboard resistance, you need to ask your gym:  "Why not?"


The reality is that a hangboard set up that does not have weights and pulleys is limiting your progress because you can not see and measure your progress accurately.

Check this out:

HB Day 2
Teach till 7:15 pm.  Ride bike home, warm up in the Dojo with 12 min of easy traversing.

Warm up on the board, with 10 seconds each on the Jugs, Open Hand, Large Edge, Small Edge, MRP pocket.

1.  Open hand repeater, +45 lbs.   3 sets, 120 seconds each , alternating left and right hand for 10 seconds at a stretch.

The following are max weight two handed hangs, ~10 seconds on, 180 seconds rest, 3 sets.

2.  Middle of small edge.  Set 1: +10 pounds, 10, 10. (8 seconds)
3.  IMR.  Set 1: +45 lbs, 45, 45. ~11 seconds
4.  Wide pinch.  Set 1: -25 (fail! 2 seconds), -40, -35.
5.  MRP.  Set 1:  +15, 15, 15. 10 seconds.
6. Small campus rung. Set 1:  +30, 30, 30. 8 seconds.

Contrast with tonight!

HB day 6

Play 2 hours of soccer, mow lawn,

1.  Middle of large edge.  Sets:  +50, +55. +60, +60 (4th set 1 finger width further out)  [NEW]
2.  Middle of small edge.  Sets: +15, +17, +20  [3rd set improvement:  +10]
3.  IMR.  Sets: +55, 60, 60 (11 seconds)  [+15]
4. Wide pinch: -25, 22, 20 (10 seconds)  [+15]
5. Crisp Crimp:  -40, 35, 30 (11 seconds) easy. [New]
6. Small campus rung:  +35, 40, 40 (10 seconds) [+10 lbs, longer hang]
7. MRP:  +20, 25, 30 (11 seconds, ok)  [+15 lbs, longer hang]
8. +50 Open hand repeater, 1 set only.  [+5 lbs]   could have done 2 more sets, but needed to cook dinner.

Weights. 


Pulleys.


Saturday, August 23, 2014

UPDATED: finger strength workout plan


Now with Pulleys!

I have a new plan and an improved setup:  I added pulleys, I am doing max weight hangs instead of repeaters, and I changed to a less tweaky crimp.  I had several very useful conversations online and in person, and think the new plan offers several improvements.  (link to old plan

Saturday the 23rd was my first workout for which I warmed up and climbed a brief 12 min ARC set.  And here is what I did on the hangboard:


  1. Hangboard warm up:   hang for 10 seconds on, 10-20 seconds off, on four or five of the holds on the board. 
  2. Open hand 'Warm Up #2' above.  
    1. +40 pounds
    2. 3 sets of 10 second repeaters, alternating right than left hand for 2 minutes, or 10 seconds by 6 repetitions.  3 min rest between sets.  Feet on wall.
    3. Next workout start weight (NWSW):  +45
  3. Small edge, middle area of edge
    1. +5, +8, +10 lbs
    2. 3 reps of 10 second max hangs, 3 min between reps.  NWSW: +10
  4. IMR
    1. +40, +40, +45 lbs
    2. 11, 11, 11 seconds;  NWSW:  +45
  5.   Wide pinch
    1. -40, -35, -30, -25
    2.  11, 11, 12, 8 seconds;  NWSW:  -25
  6. MRP, #2 above
    1. 0, +5, +10, +15
    2. 11, 11, 11, 11 seconds;  WSW: +15
  7. Small campus rung
    1. +40, +40, +40
    2. 9, 7, 8 seconds; NWSW:  +40
  8. Warm down on the Jug
    1. +40 lbs
    2. 3 sets of 10 second repeaters, alternating right than left hand for 2 minutes, or 10 seconds by 6 repetitions.  3 min rest between sets.  Feet on wall;  NWSW:  +45
Why? Why?  Why?
  • Why the alternating one hand repeaters with heavy weight?  For a given level of load per hand, the single handed hangs do not require nearly as much added weight as two handed hangs. Your single hand is suspending your entire upper body plus all of the added weight.  Increased strength on large open hand holds would greatly aid my performance at the Red by increasing my endurance on these routes by allowing me to hold on at a lower percentage of my total effort.  Strength increases on these holds also aid my progress on open hand grips with limited fingers because I am strengthening muscles for all fingers.  
  • Why keep your feet on the wall during your 1 handed repeaters if you are trying to add weight?   Single arm hangs feel very unstable and dangerous to my shoulders unless I keep my feet on the wall.  With feet, I am basically just doing an extended shake out on a good jug, but with lots of extra weight.  
  • Why max weight hangs for most of my workout?  The first principle of strength training on a hangboard should be to build strength by adding weight before reducing hold size.  Eva Lopez advocates for training strength with 10 sec hangs from holds at max weight, with 3 min rests between repetitions.  She has some experimental results that suggest that training max weight before reducing hold size will build strength more rapidly.  It makes sense to build overall finger strength before increasing the leverage disadvantage or reducing available fingers.  Finally, max weight hangs are far kinder on your skin. 
  • Why are you going against the suggestions from the RCTM on strength training?  Actually, I am not, I am just following more closely two of the most important principles:  make your workout specific to your goals, and the best way to increase intensity of hangs is by increasing weight.  Some really good ideas from the Anderson brothers' blog did not make it explicitly into the book, but I think it applies here.  If you are primarily climbing steep routes with larger holds you need to modify the basic plan and add lots of weight and do some one arm hangs.  see hangboarding FAQ #2
  • Why did you get rid of repeaters if they have been shown to be helpful?   I did not get rid of them, but I have moved them to later in my training sequence so that they coincide with some of my power endurance training.  Another reason for starting with max weight hangs is they will help me predict a good starting weight for repeaters.
  • Here is my current training season outline: 
    • Endurance and skill:  ARC
    • Strength: Max weight hangs
    • Power:  campus and limit bouldering
    • Power endurance:  repeaters and PE circuits. 
    • Performance phase
    • Rest  


Tuesday, August 19, 2014

Finger strength training plan


My finger strength training is about to begin.  This means that I have light ARC warm ups and hangboard workouts on the horizon to the next few weeks.  [I actually changed my mind about several aspects of my strength plan, here is the updated version]  


My endurance and skill training is almost completed.  I have enjoyed the whole ARC process, and I feel that I am still gaining new technical insights.   Sadly, I did not get any outdoor mileage on any of these weekends.   A broken water line prevented that, and I lost 2 training days to ditch digging, and my elbow tendonitis was not helped by having to suddenly shovel several tons of gravel and dirt.  

However, the 50ft by 1ft by 30 inch deep trench is dug and filled in again (with help from several wonderful friends).  

On tuesday, August 19th I completed my 8th training day in my ARC session, and I have one session left for Thursday.  I only climbed 1 set of 32 minutes tonight, partly because it was very hot, even after 9 pm. 

Midwest summer climbing:   
sweat runs down your arm and washes off the chalk.

In addition to ARC I also did some preliminary hangboard hangs tonight to calibrate my starting weights and identify the grips that I want to use.    I did this to allow me to rest fully on Wednesday to give my elbows more recovery time.  

Saturday will be my first hangboard workout and I am excited to start a new training chapter.  Here is my set up, and it is imperfect but workable.  Some key details:
  • The hangboard is slightly less than 6 feet off the ground.  
    • This means that if I hang straight arm I need to lift my knees to keep them off the floor. 
  • The board is mounted on a slightly overhanging section of wall, with a slight undercut and several foothold options.
    • This setup allows me to hang freely, put my feet on the wall, or even, rest my feet on the ground.
  • There are no pulleys for taking weight off.  This is a bummer, but the space is limited so I am unlikely to add pulleys here. (Although I could mount the hangboard on the side of the campus board downstairs). 
    • My current solution is to identify which grips I can free hang and add weight, which I will use footholds and add weight, and which I need to rest my feet on the ground and then add weight.
  • It seems counter intuitive to both put your feet on holds and add weight.  However, my plan is to use the same footholds in the same way each  time, and rest the same amount of weight through my feet each set, but to add weight to my harness between set 1 and 2 for each grip.
    • Downside:  this is less precise than simply hanging all holds and using a pulley and weight to change intensity. 
    • Upside:   this is more specific training for climbing, because when you are on a route you will normally be keeping your feet on and maintaining tension through your feet and upper body.    


Based on my goals and some previous training I am trying a couple slight modifications of the RCTM hangboard recommendations.  My plan is partly a compromise between the beginner and intermediate workouts with some modifications due to the limits of my wall, and making my training more specific to my sending goals in October at the Red River Gorge.  Here is my plan in order of grips to be used, beginning with two warm up holds:
  1. In my warm up I want to simulate rest stances on two different warm up grips by putting feet on holds but adding weight on harness and alternating 10 second one arm hangs, 5 reps each arm.   Weight amounts are for set 1 and set 2.  Warm ups / rest stances
    1. Jugs, +15, +23 pounds, one arm hangs.
    2. Open hand grip on pinch holds, +8, +13 lbs, one arm hangs
This open-hand grip seems specific to RRG. 
Open hand with thumb helping but 
pinky is limited at the lip of the hold, not beyond.
  1. Six different grips for beginner duty cycle, but with two sets, and added weight from set 1 to set 2.  I prefer 2 sets to 3 because the hot humid weather makes skin pain the limiting factor.  I am not sure of an exact added weight for each of the following grips..  For these grip 1 will be a dead hang, 2,3,4 will be feet on wall, and 5,6 will be feet on floor.  
    1. Middle of large edge, 10 sec on, 5 off, 6 reps
    2. MRF 3 finger, same cycle for all remaining.
    3. Small edge, on the larger, or outer end. 
    4. IMR 3 finger.
    5. Wide pinch
    6. Small square cut "crisp" crimp.


Friday, August 8, 2014

Training for the Red on a 7 foot bouldering wall


A 5 min ARC training lap in the dojo. 
[please mute / ignore the audio]

I am training for the Red River Gorge on a very short bouldering wall.  At the tallest, the ceiling is between 5 and 7.5 feet.  What the wall lacks in height it makes up for with options for traversing.

Starting in August I have been climbing 3 days a week, and after this weekend (my 6th training day) I will have accumulated about 500 min on the wall.  After that I will have 4 more training days of endurance before I switch to strength training on the hangboard.

When training endurance or "base fitness" I normally stay on the wall for sets that last about 15 to 35 minutes, and rack up a total of 80 min per training day.  That is about all that my skin can handle with the heat and humidity of the South East Ohio summer.

The lap in the video illustrates one of the least steep routes through the room and takes advantage of rests where the ceiling is high enough to actually stand up.  Other times I do laps with big moves from big holds to work full body strength.  However, I already have good endurance on big holds and want to improve my endurance on smaller holds and less steep angles.  So I am trying to spend more time grabbing smaller holds, and resting on holds that are less than full hand jugs.

The Rock Climber's Training Manual advocates for endurance training on wall angles ranging between vertical and 30 degrees but I don't really have much terrain for that.  Hopefully, creative use of rests and using smaller holds than I had used in the past (i.e avoiding most of the jugs and using more 1st and 2nd pad holds) will offset the "too steep" limitation and help me complete some tall endurance routes at the Red this fall.


Friday, August 1, 2014

Maximize your climbing performance for October

Goal:  Flash Twinkie in October

How I am going to do it:


Time to start training for peak performance in October.  Ideally, you will have rested during the last couple weeks of July.   I did one better by driving cross country, visiting with friends and putting on extra training weight with good food and beer.

I plan to keep the muffin top through the strength phase, to maximize value of the hangboard routine.

I am back at the Dojo now, and have started my new training season.  I plan to continue the steady progress I started in the spring season by following a plan based on the Rock Climbers Training Manual by the Anderson brothers.  Here are the key steps to getting started: 
  1. Rest!  Take at least 7 days off from climbing and any training that involves pulling with your hands.
  2. Plan your season.
    1. Assess last season and identify your weaknesses.  For me: 
      1. Endurance on small to medium holds
      2. Finger strength
      3. Resting efficiency
    2. Select concrete goals.
      1. Climb "Twinkie" first try (technically not a flash, I climbed it 19 years ago)
      2. Send: Betavul Pipeline, Check Your Grip, All the Way Baby, Tissue Tiger, Gung Ho, Narcissus, Super Best Friends. . . .
    3. Schedule your season training cycles, including season highlight trips.
      1. See above.
  3. Start climbing again with your first training cycle
    1. ARC (endurance), body weight fitness and skill training.
  4.  Keep good records in your training and climbing journal.


October will be here before you know it!

Friday, July 18, 2014

Get up for the down climb. . . everybody get up.


When it comes to bouldering, everyone is trying to get up, but once they get up, they need to GET DOWN! Too often, indoor boulder problems take you up high and leave you stranded.  The harder the problem, the harder it is to use it as a down climb, and for many folks this means dropping off.  

Why you should GET DOWN on a downclimb instead of dropping off:
  1. Avoid impacts and stress to your spine / back during normal landings.
  2. Avoid ankle, wrist and other injuries from landing poorly.
  3. Practice downclimbing technique.
  4. Train for power endurance or endurance. 
  5. Develop mental strength.
  6. Practice sequence visualization while on the wall.
These reasons can apply to everyone.  However, we older climbers especially appreciate #1 and #2,   And, we climbers who want to use bouldering gyms for training, especially appreciate #3 and #4.  Reasons #5 and #6 are especially important for sport climbers pushing for their redpoint limits.  The capacity to get your head together while on the wall is crucial for successful redpointing and if you don't practice it, it will feel stressful on the send.

The rest of this post is divided into two sections, advice for climbers, and advice for route setters / route setting managers. 


Bring that chalk bag.

Advice for climbers:  Use downclimbing to diversify your climbing sessions to increase your moves per set, especially during your warm up and cool down periods.

  1. Bigger warm ups and downs.  Increase your average moves per warm up by 2X or 3X.   If you normally warm up with six 12-14 move V0's,  combine them into 2 sets of 3 problems, down climbing the easiest.  
  2. Bring a chalk bag you can wear.  This seems obvious, but it is fashionable these days for boulderers to only bring a floor mounted chalk-pot.   That is cool and all, but it won't get you to the top of Lactic Acid Bath in August, or safely off the top of your local highball.
  3. Set your pace as an inverse of difficulty.  With your unfashionable chalk on your hip, practice using it at all the best rest stances.   My friend Margarita advises:  "If you like where you are, rest.  If you don't, move."  If you control your pace as an inverse of difficulty, you will find you have plenty of time to visualize the upcoming difficulties as you rest.
  4. Embrace the funk!  Use steady flowing music to motivate your long, smooth climbs.   I find the St. Germain station on Pandora to be near optimum for grooving on the wall for longer time periods.  Stay on the wall for two full songs in a row and you will feel it. 


Rene puts in time on the wall at the Shop.

Route setting advice:   All good bouldering gyms have the potential to help climbers GET DOWN with down climbs, but here are a few principles that can be integrated into the route setting to make it easier for climbers to train better, improve their technique, avoid injuries and needless wear and tear.    
  1. Moderation:  Down climbs should be a few grades easier than the adjacent up problems, they should have plenty of foot options, and generally should allow climbers to practice good technique.   Standard jug haul problems can be used for down climbs, or gyms can add holds to existing sections of wall, and encourage down climbs on any holds in a certain area of the wall. 
  2. Hold selection:   Side pulls, generous pinches, and positive jugs  are generally easier and safer to down climb than problems with slopers, or moves like long lock-offs or deadpoints.   Why?  Jugs, side pulls, and good pinches are less body position specific, and when down climbing you have to control your body’s momentum through a wider range of positions relative to the holds.  
  3. Campgrounds:    problem sets should integrate 'campgrounds' to help climbers improve their resting technique and to avoid crowding.   A campground is a stance that allows climbers to hangout, match, chalk, and de-pump on the wall.  It also allows climbers to wait their turn in case another climber is linking through the same section of wall.   Add campgrounds in sets of 2 such that two climbers could rest at the same time, and avoid blocking each other in their upcoming sections. 
  4. Integrated playlists:  Design sections of walls into integrated sets of problems.    Each problem is like a song, and each section of wall is like an album or playlist.   Intentionally setting the problems in linked sets make it possible to use down climbs to connect the up problems.   This is the key to using bouldering gyms to train for endurance, and one that most gyms miss.


MVWL, etc.
  1. It is helpful to think of the layout of the problems in terms of combinations of letters.  Good shapes include letters like M,V,W,L.   On overhanging walls,  L and reverse L down climbs can be used to link to whole sets of up problems, especially when the wall top includes a lip traverse.  This prevents the low traverse from interfering with the upper sections of the problems.  
  2. Set aside different sections of walls for climbers of different levels to enjoy long link-ups.   For instance, make three different regions of your gym each with an integrated playlist suitable for ARC training for climbers at low, medium, and high levels of challenge.  

Conclusion:  Finally, route setters and climbing instructors should work together to both promote and educate local climbers on how to best take advantage of the integrated problem sets and down climbs at your gym.   Without adding any extra space or holds, your gym can create valuable training resources, and in doing so, raise the overall quality of experience at your gym.  


Wednesday, June 18, 2014

Compact Campus Board


Standard campus boards are huge (4ft by 8ft) and won't fit in the space available in our garage.  This compact design fits some nice features into a smaller 2ft wide by 6ft tall layout.  A couple weeks ago I installed the frame, the lower panel, and the first 5 sets of rungs.  Last week I added the top panel and some more small rungs, including half a narrow ladder along the left. Today I filled it out with the remaining  medium rungs.

The board starts at 44 inches above the floor, and finishes between the rafters on the ceiling at 10 feet.   The main ladder starts with Small #1, and continues up to S7, then it shifts left a few inches for S8, and then S9 is at the top between the rafters.  The shift is needed to center the climber prior to the final reach between the rafters.  The rungs are Moon spacing, so every jump between rung on each size ladder is 22 cm.  Every half step alternates the rung size between small and medium.  The first half row starts with Medium #1, and finishes on M8, the second to last rung between the rafters.  I chose to devote the maximum vertical distance to the small rungs in order to allow us to make the longest moves on the smallest rungs.  [Perhaps some rock star will drop by the Dojo and knock out some 1-5-9's.]

 The smalls on the half ladder (on the left side) are on the same level as the mediums on the main ladder.  This new half ladder will allow people to campus half step standard ladders on smalls or mediums for the first 12 half rows.

Of course, I realize that the Anderson brothers (Rock Climbers Training Manual) advise against alternating rung sizes (as I have on the main ladder).  I think  that the main down side of alternating is that we cannot do matching ladders at half steps, and we cannot work max ladders at half steps as easily.  However, matching at half steps makes for really short moves, even on the small rungs so I don't think that is a big loss.  The half steps lets us have full width rungs and fit two sizes onto a 2ft board, while also allowing us to do standard (non matching) ladders on both sizes.  We can also still work half step increments on single move max ladders, although with some constraints about which rungs we start on.

Anyways, I am hopeful that this design will allow us to ramp up our power workouts without sacrificing too much campusing flexibility and too much more of our storage space.

See my original post on the build of the board for other design details.


Sunday, June 8, 2014

Compact Campus Board: New addition to the Dojo


I constructed a campus board downstairs at the Dojo.  Originally I had planned to squeeze it in upstairs, but the low ceiling turned out to be more of limitation than I expected.  5 hours of garage cleaning revealed enough space for the campus board downstairs!


With the 9ft ceilings there is now plenty of room for putting together decent sized upward movements. Currently I am just getting back into campusing, so this initial version is plenty challenging. Once I get some basic fitness together I will work on doing the 1-3-5 on the medium rungs, and get solid on the basic ladders on the smalls.  Later in the fall I plan to add more rungs to fill up the remaining height.  Here is what the board is like now:
  • Two interspaced sets of 5 rungs, made by Wood Grips smalls and mediums from Metolius. 
  • Incut side up
  • Moon spacing (22 cm on center) for each set, alternating every 11 cm between sets.  
  • 15 degrees overhanging
  • Nice smooth birch veneer plywood (no splinters!)
  • Room for narrow set of more juggy holds on the left for kids, warming up and down climbing
  • Lowest rung is about 44 inches above floor
The 9ft ceiling means that we will not be able to set up a full max ladders (1-5-9) unless I extend the last bit of plywood between the rafters.  Doing so would also require shifting the upper rungs to the center of the panel.  I doubt that I will actually need to train for such extreme power, but perhaps someone at the dojo will want to work the biggest max ladders.


In the RCTM the Anderson brothers are unequivocal:  do not intersperse types of rungs.  Well, I did it anyways.  I only had room for one ladder, and I wanted two different rung sizes.  So, I adopted part of their advice and omitted the large rungs, selecting only mediums and smalls.  Each ladder rung is 22 cm on center, and alternate one size and then the other every 11 cm.  What do I gain?  Two different levels of difficulty.  What do I lose?  Option to make 1/2 distance moves without switching to the other size.  Not a big loss. [Actually, it is a big loss when it comes to making incremental progress at max ladders.  However, we can partly solve that by adding alternating half rungs on the left, see next post]

Ted's mini review of wood grips rungs from Metolius:    

I ordered wood grips rungs for the campus board because I wanted the rungs to be, as much as possible, perfectly standardized.  Making a campus board with standard sized rungs, standard angle, and standard spacing allows comparison of performance on this wall to others.  For instance, when I am able to do 6 sets of 1-3-5 ladders on the smalls I will have a sense of where my fitness has progressed.   So, I was always going to order the standard sized rungs.  

 I ordered sets of both small and medium sizes through Amazon.  However, the mediums came from a larger supplier than the smalls.  The mediums shipped immediately and when I opened them up I was pleased to see they were just as I expected:  uniform, well textured, and consistent.  I really like the slight incut shape that is built into the upper surface (with the logo right side up).   Anyways, based on the mediums I was super happy with these rungs.  

I was quite surprised and and a bit disappointed with the smalls after unboxing because they were not consistent thickness.  I suspect that the set of smalls that I received is not typical for wood grips, and perhaps represent an earlier manufactured set, or a set that slipped past quality control.  Two rungs are thinner on the ends than the others due to the fact that the wood is warped and likely was warped before the sanding process.  The sanding reduced the warp by thinning the holds on the ends.  One rung was especially warped and is noticeably thinner than it should be.    


How much thinner are these, and how much does it really matter?   They seem about 1/16th of an inch thinner, perhaps a bit more at one end.  Is that enough to really matter?  Perhaps?  I can't tell yet because I put the thinner rungs near the top of the ladder.  Perhaps once I am using them regularly I can better assess how much it increases the difficulty of the rungs.  For now I would rather have them in place than deal with exchanging them or any nonsense.  Besides, if they really bugged me I could shim the ends to get the right depth.  


Going forward I plan to add 2-3 more rungs in each the medium and small ladders.  I am not sure if I will buy more of the wood grips or if I will make my own.  I am now certain that I can make them consistent to the standard sized models from wood grips.  For the smalls I think I will make my own from standard oak moulding and a bit of time with the orbital sander.  The big functional advantage of the wood grip rungs (besides standardization) is the incut, in addition to the rounding.  However, on the smalls, most of the depth of the rung is rounded, so the incut was not nearly as pronounced as on the medium rungs.    The final lesson I would draw from all of this is that it if possible, I would open and inspect all the rungs in a set before purchasing just to make sure they seemed as consistent as possible.