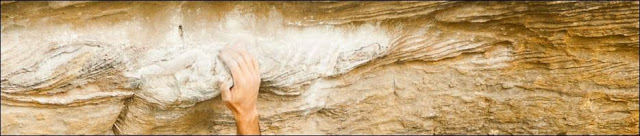
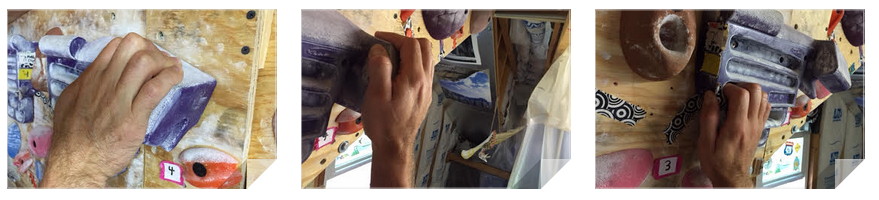
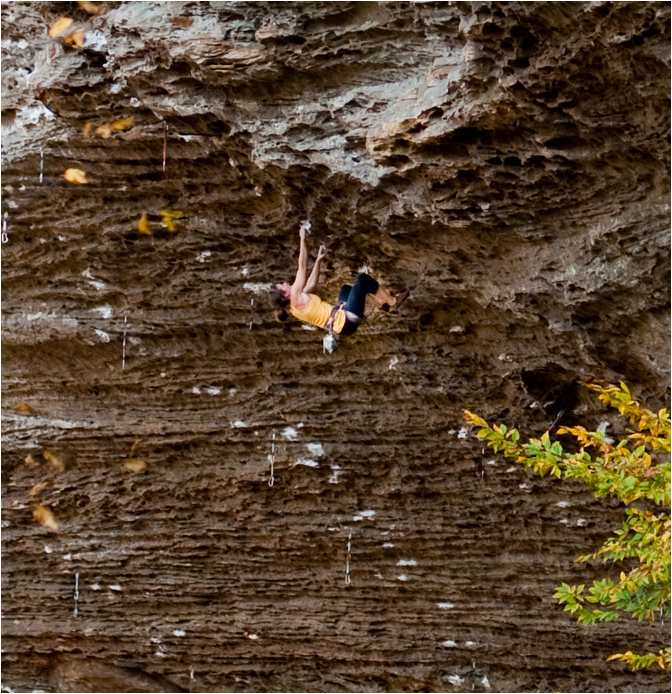
This hold reaches deeper than the climber’s hand. Holds like these are common on sandstone cliffs at the New and Red River Gorge. You run into them at other crags too, especially on steep routes with large features. While it is possible to crimp or actively squeeze these holds it is more effective to use a type of relaxed, open hand grip where you pull with skin at the base of your fingers more than with your fingertips.
Deep hand holds tax a different subset of muscles
Using an open hand grip on deep holds relies primarily on friction produced on the palm or base of the fingers by maintaining a slight flex at the wrist and the joint of the finger closest to the wrist (MCP joint). Because the friction surface is lower on the hand, or prior to the DIP and PIP joints, the flexors (and extensors) that uniquely activate the fingertips can be largely relaxed, while the wrist and MCP flexors do the work. On routes where hold depth is mixed, climbers can take advantage of of deep holds as strategic rests, and get much more mileage from their level of fingerhold fitness. This shifting of effort from one muscle group to another follows the same logic as using handjams on face routes, but it is more subtle. Unless you climb routinely on the sandstone jug hauls you might not even be aware that these ‘virtual handjams’ even exist on the routes.
Deep hold rests can hide in plain sight
The photo above demonstrates how illusive these rests can be. A few inches to the left of the climber's hand you can see a platform on the hold that has two sharp edged square cut lips set at 90 degrees from each other. The left hand can be rested on the front, and the right hand can be placed sideways, in a semi false grip that leverages the lip that cuts back towards the wall. From that position the fingertips can be relaxed as the sharp edge cuts some friction into the base of the fingers. Although such rests can be painful, the intense friction at the base of the fingers means that the wrist and MCP flexors do not have to work very hard to maintain a grip. During a careful shake out all of the forearm muscles have a chance to recover.
If such rests are available, why not use them? Perhaps the pictured climber is just warming up and wants to get a better pump. Or perhaps he is so strong that he has no need to minimize the effort spent with his fingertip flexors on this route.
However, it is also possible that this climber trains primarily on shallow holds and has not cultivated strength and experience in gripping deep handholds. This cultivated strength seems to come primarily from projecting steep 5.12+ jug hauls, where success comes from milking every rest. However, if you can train for these holds at home, with enough training The Midnight Surf can start to feel as restful as a slab.
(Midnight Surf, Muir Valley, RRG)
In this post I want to do the following:
(1) advance the discussion of the range of muscles involved in holding deep and shallow holds.
(2) suggest that climbers need to train wrist and MCP flexors specifically, which involves applying force low on the fingers/ hand in order to maintain the grip.
(3) recognize that endurance should be cultivated for both depths of grips, which allows for strategic endurance that extends finger flexor fitness by shifting effort to other muscles.
(4) share some updated observations I have about cultivating deep hold fitness across training cycles and using deep hangboard grips.
(1) Let’s discuss the range of muscles involved in deep and shallow holds
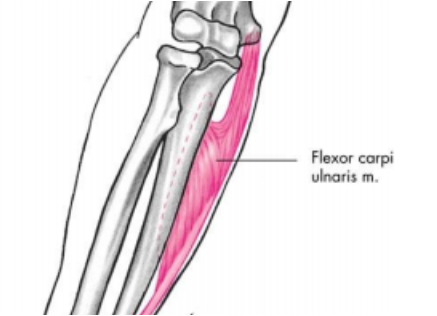
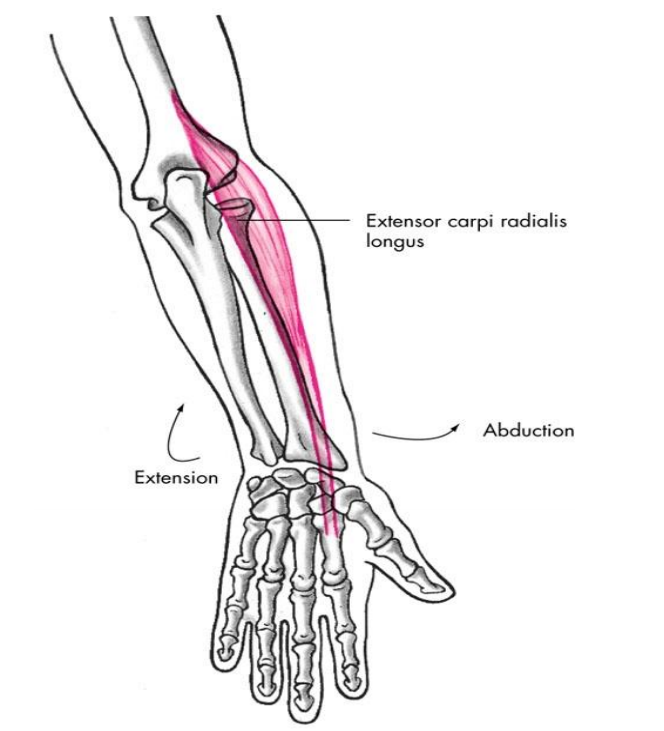
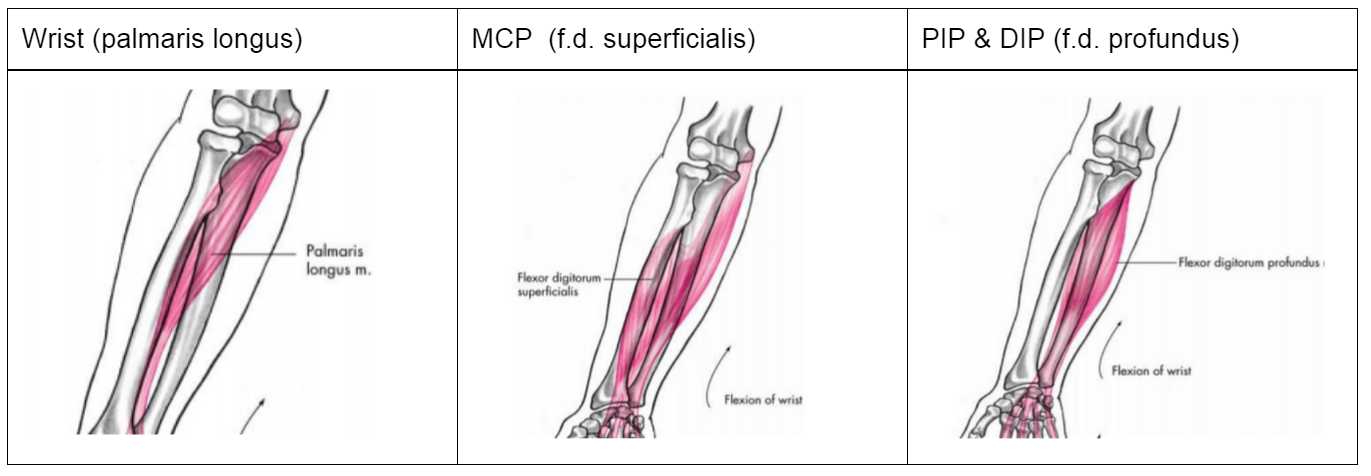
There are six hand flexors. Three flex the wrist only: flexor carpi radialis, flexor carpi ulnaris, palmaris longus; and three that flex both the wrist and the fingers: flexor digitorum superficialis, flexor digitorum profundus, and flexor pollicis longus. There are also 6 that extend the wrist, of which four also extend the fingers.
Note: The isometric contractions used on climbing grips engage a complex array of wrist and finger muscles. Furthermore, the particular muscle fibers that are engaged depend in complex ways on the combined positions of the elbow, wrist, and finger joints. Therefore when I distinguish muscles by hold depth and type those distinctions are ones of emphasis (the finger flexors find relative rest, not complete rest while that hand grabs a deep hand hold).
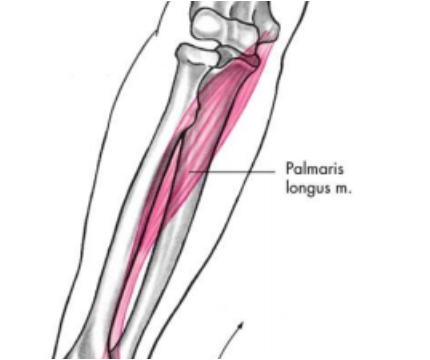
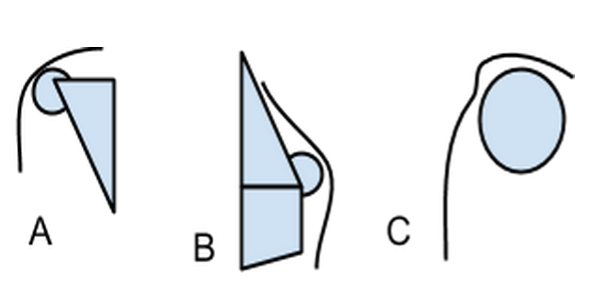
The following three muscles attach to the hand below the finger joints. To the extent that strength from these can be cultivated, then that strength can be used to deflect the wrist and hold weight that the other flexors can avoid. Of the three ‘wrist only’ flexors palmaris longus (C) flexes the wrist strictly and is the main actor that presses the palm forward. The flexor, f.c. radialis, (A) also abducts the wrist and is engaged when pressing the palm of the hand near the pinky finger. F.c. ulnaris (B) flexes and also adducts the wrist and thus presses the palm forward near the index finger. The other hand flexors flex both the wrist and the fingers. These that perform mixed duty are important on deep holds for wrist flexion and because deep holds will often provide some friction low on the fingers but above the hand.
A. Flexor carpi radialis
|
B. Flexor carpi ulnaris
|
C. Palmaris longus
|
|
|
|
|
Source for images: David Q. Thomas, lecture notes in Anatomy and Physiology
Of flexors of both the wrist and fingers, two are of special note.
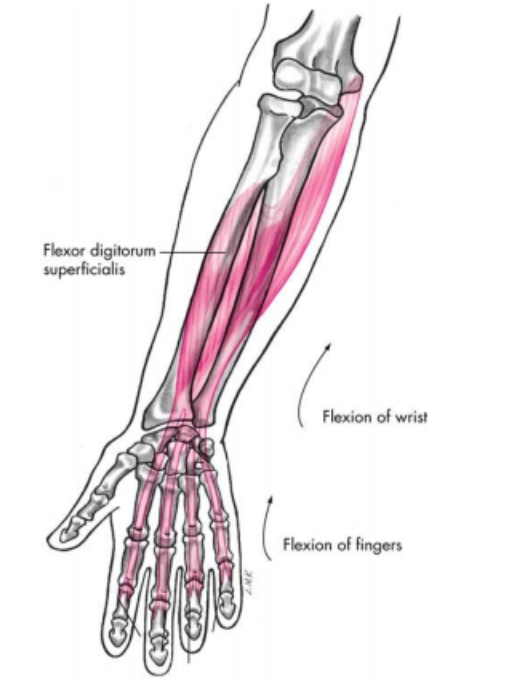
D. Flexor digitorum superficialis (originates in the medial epicondyle of the humerus, radius and ulna and inserts in the middle phalanges 2-5)
|
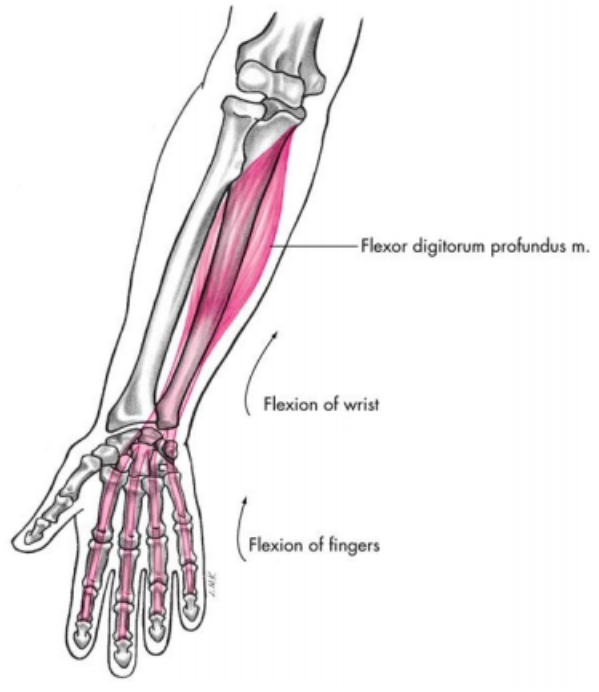
E. Flexor digitorum profundus (originates in the ulna and inserts in distal phalanges 2-5)
|
|
|
|
The difference in insertion points (between D and E) seems to be key. The flexor digitorum superficialis inserts into the middle phalanges, while the flexor digitorum profundus inserts in the distal phalanges. This means that the the f.d superficialis can join the wrist flexors on deep holds where friction is concentrated near the base of the fingers. In contrast f.d profundus is crucially necessary when effort must be exerted at the fingertips. This is the crucial muscle to train for shallow, open hand holds because it can engage even when the wrist and MCP joints remain in a neutral, un-flexed, position.
The rest of this post will simplify the situation to assert that there are two basic sets of muscles:
hand hold muscles which (primarily) flex the wrist and MCP joint, training these leads to deep hold fitness
finger hold muscles, which include both flexors and extensors which (primarily) activate the PIP and DIP joints, training these leads to fingertip fitness
shallow open hand grips highlight the flexor (E)
crimps highlight both flexors and extensors
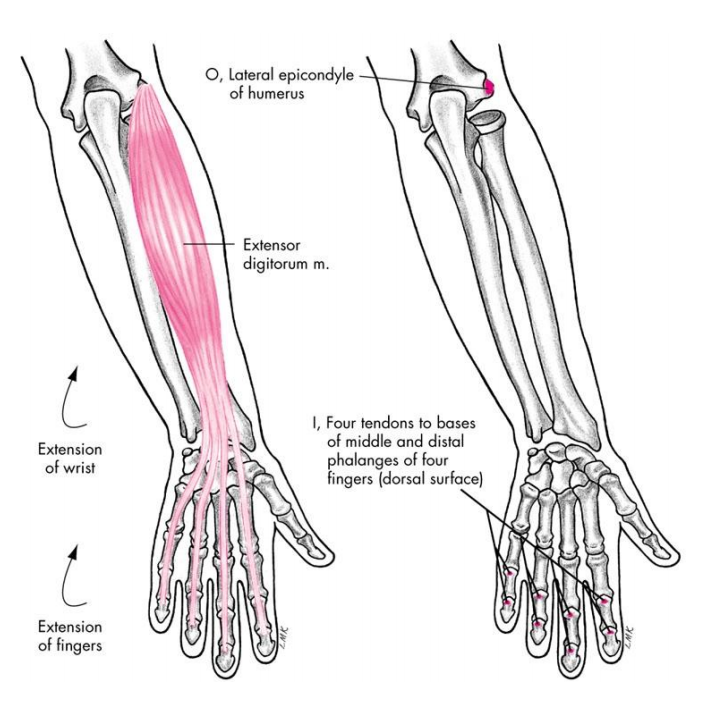
F. Extensor digitorum
|
G. Extensor carpi radialis longus
|
|
|
|
Crimp and half crimp grips activate both flexors and extensors, and resting these muscles is key to success on routes that mix fingerholds with deep hand holds. These muscles (and other wrist and finger extensors) are visible on the outside of the arm and can be notably relaxed when grasping deep hand holds. In a point that I emphasise later, it is crucial to train endurance for these muscles too by integrating crimp grips into your ARC and recovery workouts.
(2) If you want to be strong on deep hand holds you need to train your wrist and MCP flexors specifically, which involves training on holds where applying force low on the fingers is crucial to maintaining the grip.
Most hangboards and the vast majority of artificial climbing holds are designed to be grasped with the first and second pads of the fingers. Training on such holds will also develop hand hold muscles somewhat, but that limited development is far less than what those muscles will develop when specifically trained.
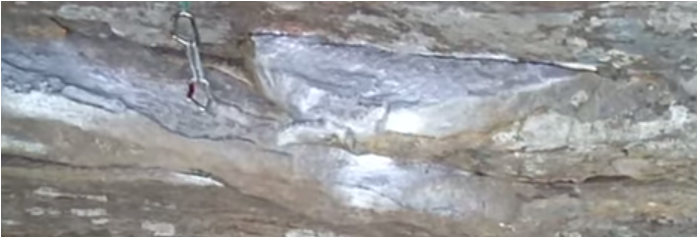
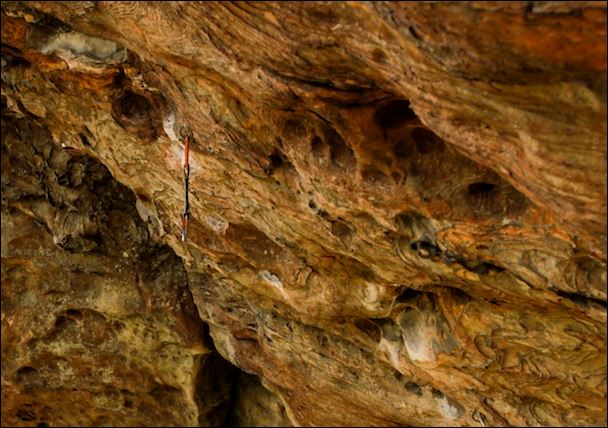
Holds that isolate the wrist and MCP flexors are characterized by a pronounced change in direction and a relatively sharp or grippy external corner. The primary grasping area of the hold is near the lip, and they are not grasped actively with the finger tips, instead the fingertips float freely while the base of the hand is pressed on the outside corner. Such holds are also deep enough that the fingers are unobstructed as the hand and wrist exert effort to hang from the corner of the hold. On sandstone these are visible as ledges that are nearly square cut, with either sharp or high friction corners. They also occur when jugs are sharp or positive enough that the primary surface of effort is at the base of the hand.
(Sharp lipped square cut jugs on Cell Block 6)
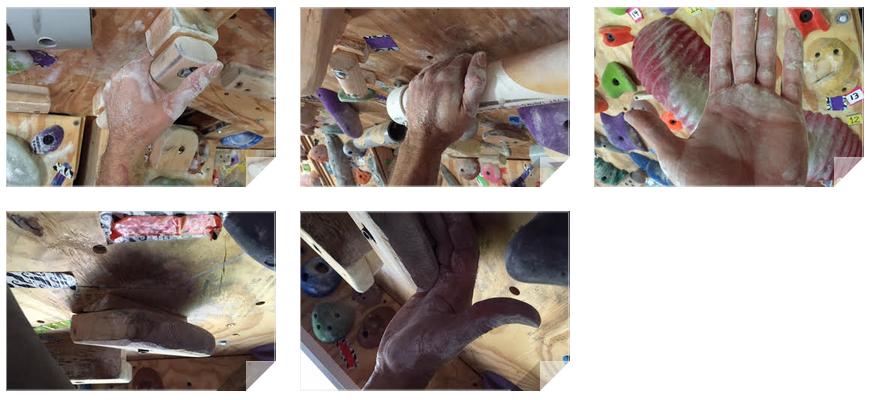
In the gym it is rare to find holds that can be engaged deeply with the hand and also lack an active finger hold surface. The closest you will typically see are either jugs that are too easy to grab or deep slopers that engage open hand finger hold muscles and hand hold muscles. Here are some in my home climbing wall.
The first photos show simple handlebars that can be grasped by relying on the friction at the base of the fingers. The third image shows a chalk line of the primary gripping effort on the wooden handlebar. The last two photos show a square cut wooden roof jug that allows for a deep grip at the base of the fingers using palmaris longus. This hold also engages the f.c. radialis while pressing the pinky side of the palm into the corner. As part of my ARC training I have started to integrate steep and deep rest stances that involve camping out on holds like these.
Figure A shows a schematic of the side view for an overly simplistic design of a deep hand hold. The curved line suggests the position of the hand. B shows a hand hold sloper and C is illustrates the MaxPull training hold which engages a full range of flexors from the palm to the fingertips, discussed later.
 The strength and endurance that we develop through training result from the types of grips that we use. For instance, climbers who only climb on shallow pockets and thin crimps won’t find these holds to be restful as someone who also trains on deep open hand holds. I have certainly witnessed climbers who feel more secure crimping the lips of deep square cut ledges (to their detriment as they spend all their fingerhold endurance on holds that do not require that type of effort). Conversely climbers who only cultivate endurance on deep holds will find sustained thin hold routes to be impossibly tiring. Others who specialise in bouldering on big compression problems on smooth granite blocks will have deep hand strength, but will still get pumped on 90 foot jug hauls. A well rounded climber needs to, at the very least, develop strength and endurance for all the major types of grips both deep and shallow.
For many climbers, the only place they encounter enough deep holds to really train on them is at steep crags like the Red. So, new climbers to the Red they are unprepared for the rest holds they encounter, and thus they perceive themselves as lacking endurance. But they are not lacking endurance in their finger flexors. They likely have all the endurance they need for long fingery face climbs.
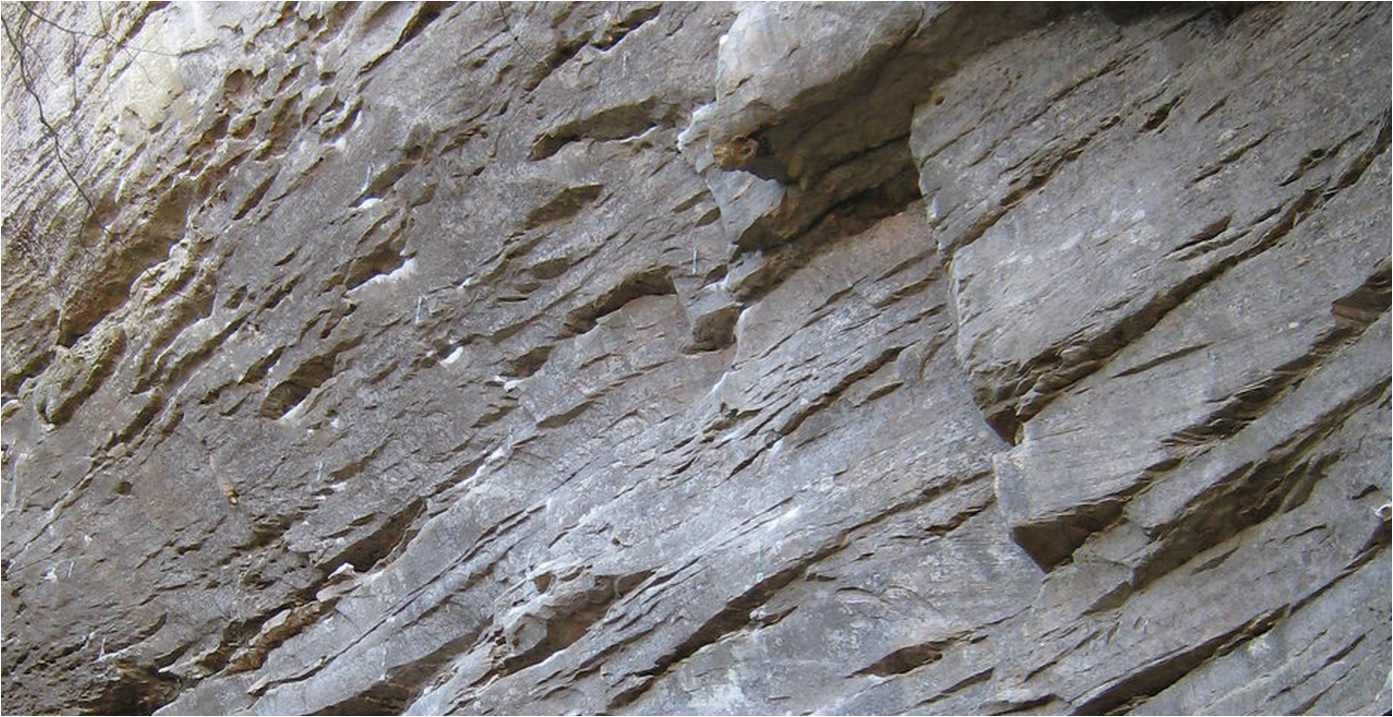
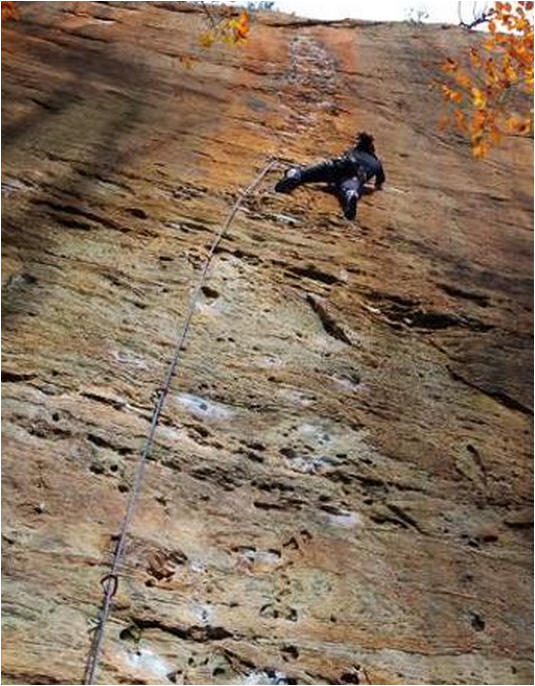
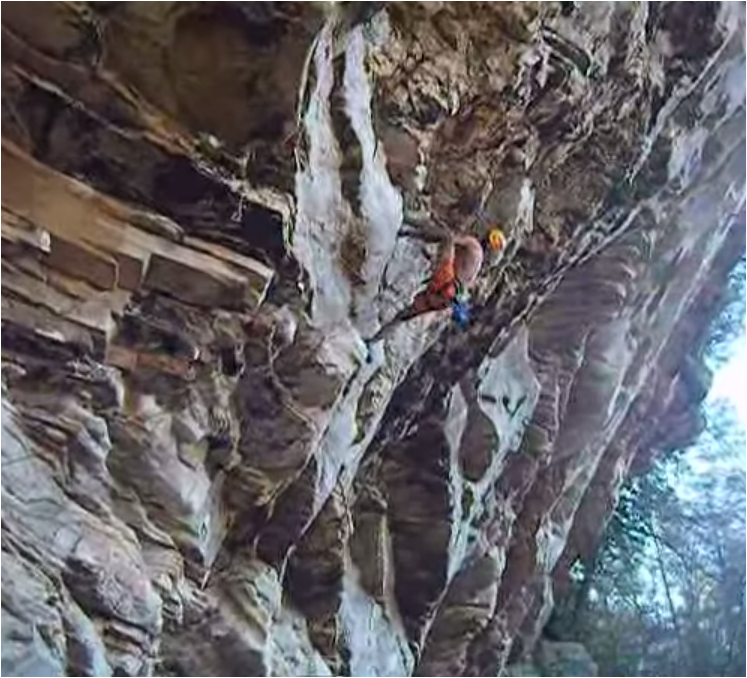
However, gaining Red River fitness requires an addition to the standard dimensions of fingerhold based fitness: strength and endurance on deep handholds. Training on deep holds that tax the wrist flexors and f.d.superficialis will result in strength and endurance specific to those types of holds. In this photo a deep, sharp lipped hold lurks on Stunning the Hog, a rare relief from pinches and slopers. This already sustained route becomes much more difficult if climbers ignore the rests that such holds can provide.
(3) Endurance should be cultivated for both depths of grips, which allows for strategic endurance that extends finger flexor fitness by shifting effort to other muscles.
 Fingerhold endurance, is what you need to grab small and medium crimps over, and over again like on the RRG routes Soul Ram, or Orange Juice. This type of endurance is trained by ARC workouts and PE workouts that concentrate primarily on shallow open hand holds and crimps. Finger extensors, crucial for crimping will not develop endurance unless moderate and easy crimps are a regular part of ARC training. [The RCTM clearly advises for ARC training to use lower angles, smaller feet, and thin holds precisely because fingerhold endurance is so crucial to success on technical face climbs and as the difficulty of all angles of routes increases they tend to include longer, more sustained sections of thin holds.]
 Deep hand hold endurance, is what is needed to hang from a long series of deep open hand holds like on The Return of Chris Snyder or 40 Ounces of Justice. This type of endurance is trained by climbing “steep for the grade” routes where you can rest your way to the top. In the gym you can train ARC workouts that include deep hand holds with steep rest stances, where the holds bite into the skin at the base of the hand. Wrist and MCP flexors need to be repeatedly engaged while holding high proportions of body weight, otherwise these muscles will not be strong enough to hang the “rest holds” while relaxed enough to allow blood flow and recovery.
 Strategic endurance, is what is needed on routes that intermix deep and shallow holds on steep sustained walls. In my experience, Apollo Reed and Table of Colors are good examples of routes where you can recover on a couple key deep hand hold rests and get back your finger strength to pull the comparatively powerful crux sections.
If we assume that most RCTM climbers will be training primarily on shallow holds, they could benefit from some training to raise the fitness of their wrist and MCP flexors (A,B,C,D). They could use fitness in those flexors to functionally extend the fitness of their other flexors(especially E) and their extensors (F and G).
A climber could increase their “deep hand hold” fitness and seemingly become stronger at “finger holds” too by keeping fingerhold flexors relaxed as often as possible, and by recovering mid route with a long term rest that “spends” deep hold fitness instead of the more scarce finger hold fitness. This is the same principle underlying finding rests on hand jam rests where the thumb flexor pollicus longus is primarily utilized instead of the other wrist and finger flexors.
(4) Some thoughts on cultivating deep hold fitness while training and using deep hangboard grips.
Training effectively should take into account how finger and hand fitness are cultivated from different types of grips. For generalist climbers it seems prudent to adopt training practices for endurance, strength, power, and power endurance that are either duplicated for both hold depths (and therefore both finger and hand flexors) or effectively combine use of both hold depths. At the very least it is helpful to consider how failing to train for particular fitness types on one of the hold depths can create a weakness in a climbers abilities.
There is a good discussion on Mountain Project ( http://www.mountainproject.com/v/v-scale-vs-climbing-scale/106590667) of how people translate bouldering difficulty to route difficulty. The range of perspectives illustrates how different climbers experience these grade translations differently. I would argue that this is largely because of how the climbers differ in terms of cultivating fitness for different grip depths and each climber’s balance between strength, power, power endurance and endurance on those depths.
For instance, climbers who only ARC on steep terrain with deep holds should not expect to have much fingertip endurance, and will correspondingly relish steep juggy routes and shrink from sustained, thin face routes. Similarly, ARC ing on shallow fingerholds will not stimulate the deep hand hold flexors, but will prepare a climber well for the long face routes at Smith.
Most of the training suggestions in the RCTM are centered on fingerhold fitness, which is generally great advice, because fingerhold fitness is often the key limiting factor. However, the universality of some of the specific training activities should be considered in light of the specificity of hold depth. Thinking about my own training in this way helps me understand my lack of progress in some areas and surprising progress in others. During the last two seasons my distribution of activities was very unbalanced by hold depth
I trained ARC primarily on open hand holds. While I gained some general endurance I did not especially highlight the use of deep handholds. I also never crimped while ARC climbing or warming up. Hence, my endurance is focused primarily on medium open hand holds. I have almost zero endurance for crimping and my deep hand endurance is limited as well.
I trained strength on shallow open hand pockets and half crimp edges. All of my hangboard grips only made contact on the last pad of my fingers. MCP and wrist flexors were not trained for strength.
I trained power on small and medium campus rungs as well as some crimps, two pad open hand slopers and pinches. Once again, MCP and wrist flexors were neglected although I do not climb many routes or boulder problems where such power is crucial.
I trained power endurance on medium crimps, medium pinches, and two pad pockets. I had no deep slopers or open hand holds that engaged below the second pad. I feel as though PE and ARC training did engage the MCP flexors as well as the open hand finger holds.
Here are the changes I am making to my workout cycles.
Base Fitness. Adding stances and rests that highlight hold types where my endurance is lacking. I identified and created additional steep rest stances that rely on deep holds. I also created slightly steep rest stances that use solid 1 to 2 pad deep edges where I can use a simple crimp grip as a resting grip. During my ARC session I also maintained the general supply of the variety of medium sized, mostly open grips I have been using for rests and moves. Finally, I make sure that I integrate a full range of hold depths and types into my ARC moves.
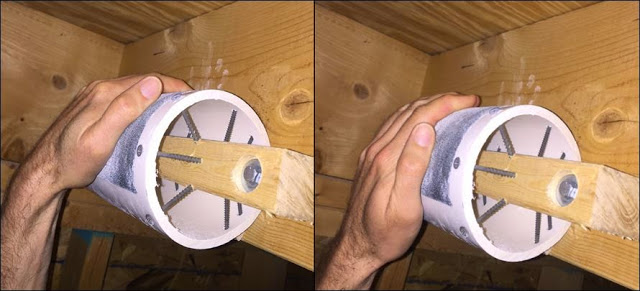
Deep hand endurance/power endurance. During my ARC and PE phases I am training open hand endurance on the 4 inch Maxpull board. These grip taped full depth cylinders engage every joint from the wrist to the DIP. The full depth of the pipe means that wrist and MCP joints are engaged in a very skin friendly manner. (unlike many deep jugs with tend to have sharper edges). I find that I can still put in a good workout on the Maxpull even after my skin is too sore for another ARC session. This is because the effort is spread over a wide area of skin and you hand stays very stable on the hold (until the last few seconds of a failed hang).
I use the Maxpull board as a cumulative fatigue exercise, similar to hill climbing in cycling. The goal is to complete 3 sets of 5 hangs. Each set is composed of five static hangs of 45 seconds or until failure, seperated by a 15 second rest. The short 15 second rest is key to build fatigue across repetitions. A 5 minute rest between each set allows only a partial recovery, and I have explored shorter rests finding that 3 minutes works, but 2 is too brief.
I find that my early repetitions primarily load the palm of my hand and my fingertips. As fatigue grows with each additional rep these flexors weaken and my grip shifts. Then I actively engage my MCP and PIP joints to take some of the burden. By the time I get to my final repetition all of these flexors are fatigued and begin to fail as I slowly loose my grip and fight the eventual slide off. An important aspect of the hold is that every joint can contribute to holding the grip, and therefore the progressive exhaustion of each pushes more effort onto the remaining functioning flexors. During these workouts you will experience the most intense and extensive forearm burn that you will ever feel. It is extensive because it engages all three of these:
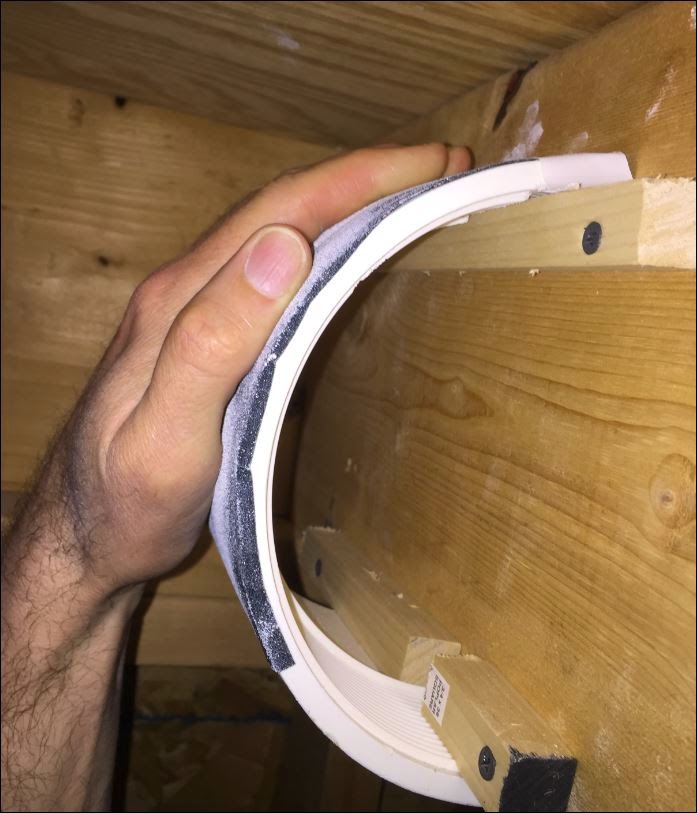
Strength / Hang board. Deep open hand strength requires holds that engage all four fingers across all joints. Most hangboards are not deep enough to allow this. Shallower slopers tend to neglect the pinky and to concentrate force on the first two finger pads. This 7 inch half pipe provides three great training options. (1) work all finger joints by hanging it from the position depicted below. (2) isolate the last two finger joints by hanging from a lower starting position (3) isolate the lower finger joints by starting from the upper position but with a slightly more than half width section of duct tape under the fingertips of the index, middle and ring fingers.
You can see from the photo that I have a narrow strip of duct tape covering the top inch of the hold, marking the highest position that I use.
I plan to use the same 7/3 second duty cycle and general protocol of the RCTM intermediate HB workout with this grip. I plan to use options 1 and 3.
To address my limited capacity to use large crimps effectively on steep routes I am looking for a flat, deep crimp grip to include in my HB range in order to make sure that I build strength in my finger extensors. I am considering these two options.
Power. I am leaving my power cycle unchanged. I will continue with a combination of campusing on medium and large rungs, and limit bouldering on a range of challenging open hand and crimp grips. However, if I were primarily looking to boulder on open hand and compression problems I would look for:
a beam to work on sloper campus moves combined with compression.
a gym with a hold budget enough to have lots of giant sloper problems
half pipe sloper campus rungs
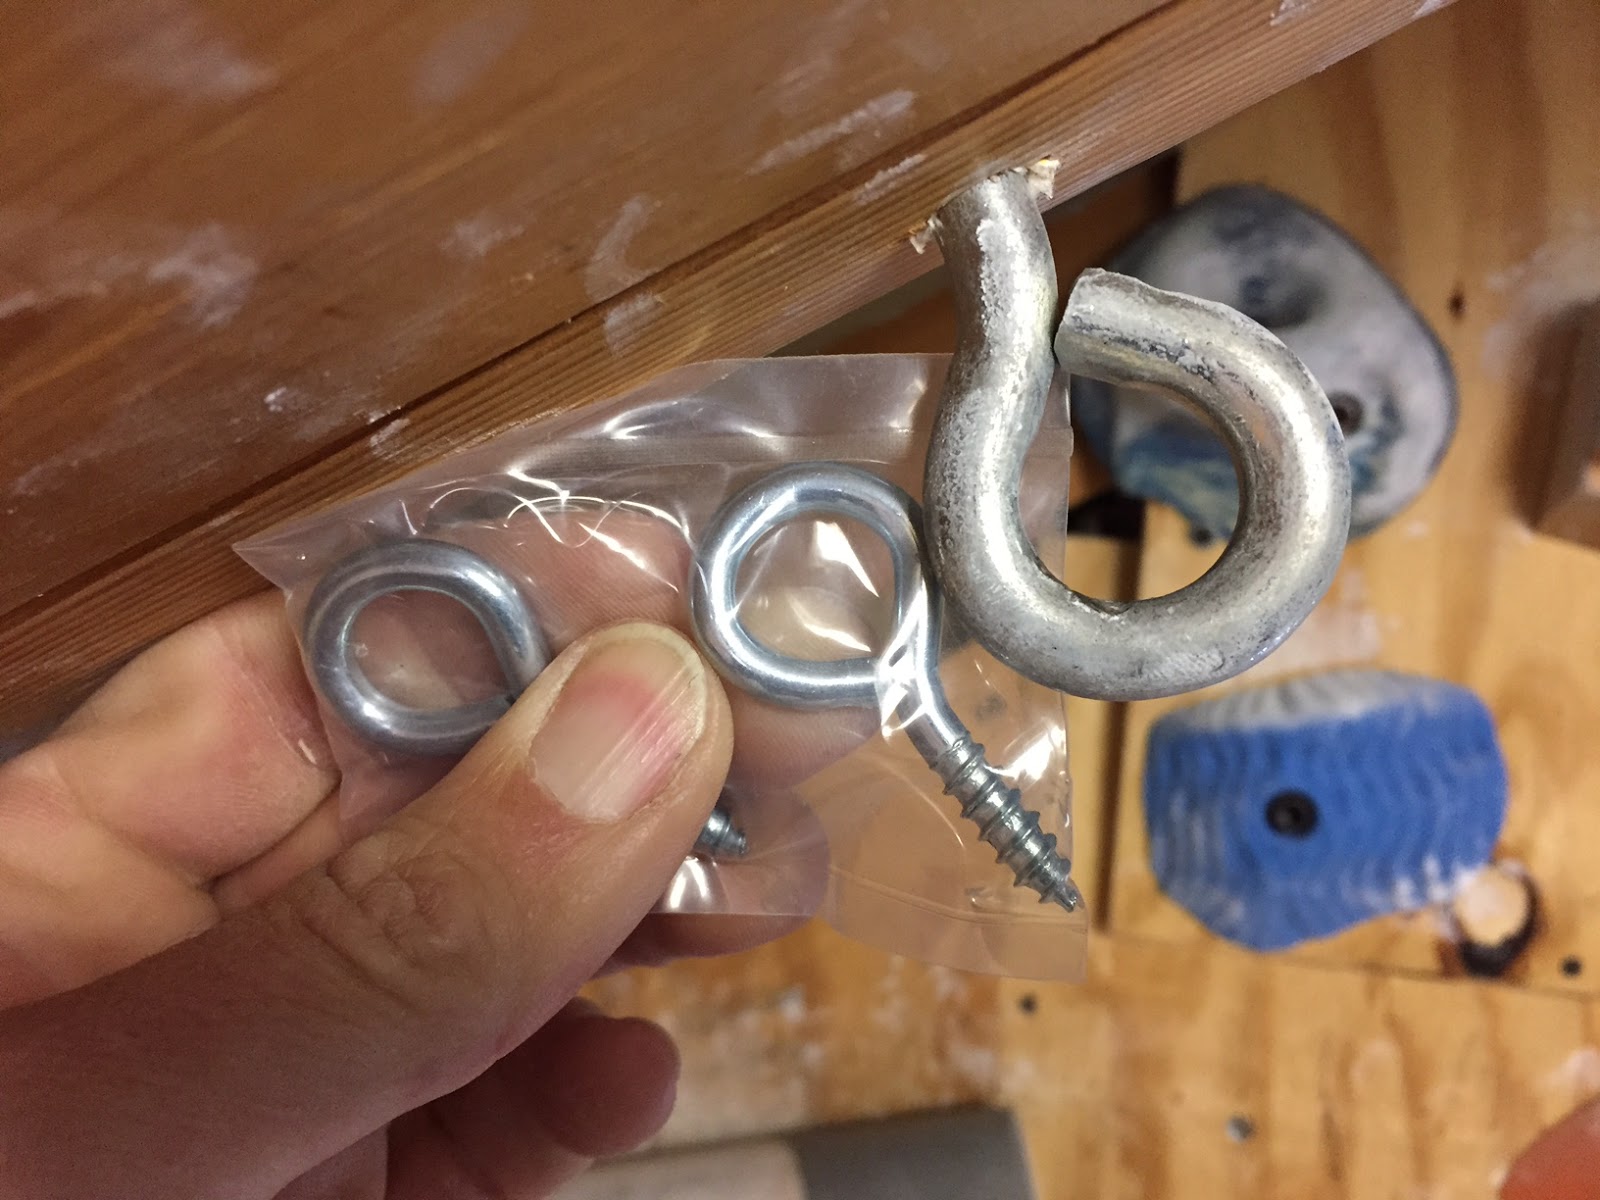
Construction: 4 inch Maxpull board. There are plenty of other ways to attach a 4 inch pipe to a wall or pull up bar. My method here works ok, although the pipes flex a tiny bit when weighted. I plan to make another version that I can simply strap to a removable pull up bar by using a single section of pvc the width of the doorway. For any design you want the tube to be stable, the grip tape to be well adhered, and the full depth pipe to maintain the cylindrical shape.
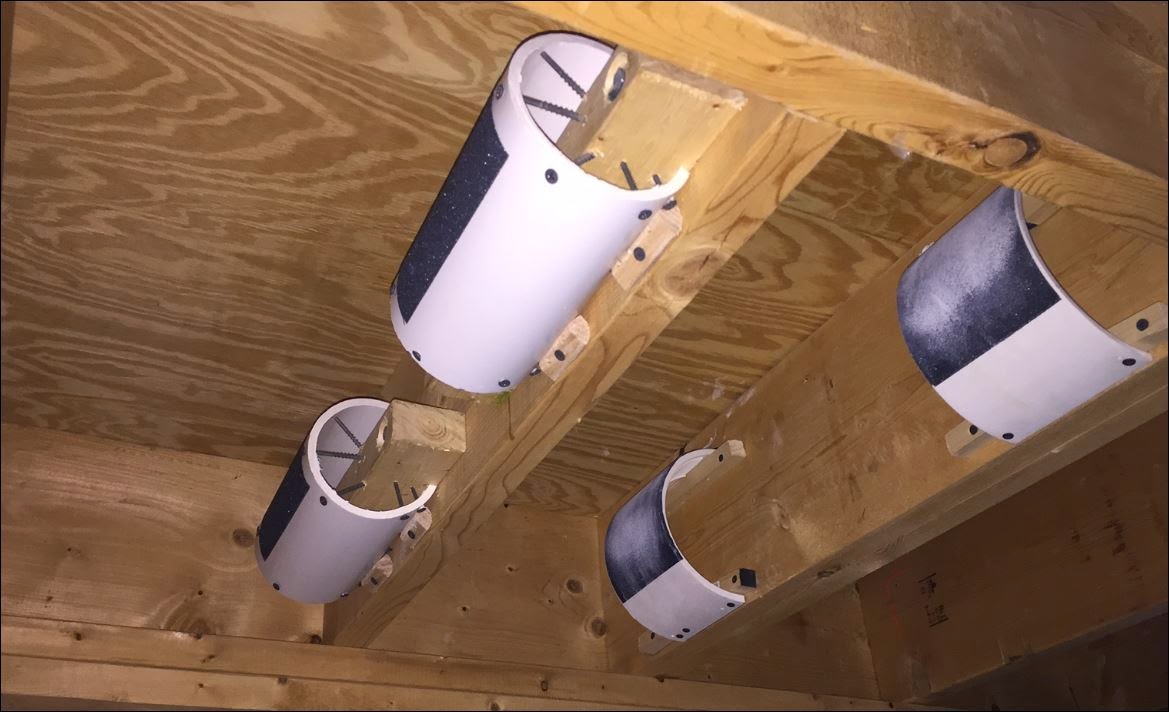 Construction: The deep sloper is made from a threaded connection piece of 6 inch (interior measurement, 7 inch exterior) PVC pipe. I sanded off the ridges on the outside, cut it in half and screwed wooden feet onto the corners. The surface is covered in skateboarding grip tape which overlaps the top edge of the pipe and is pinned between the wall and the top wooden feet. Note: you can see a band of white duct tape along the top inch of the pipe which keeps your grip lower on the pipe, making the grip more challenging and keeping an ergonomic wrist position.

This table provides a simple baseline estimate for the proportion of body weight that would be carried by hands in a standard rest position. I posted it to prepare for a post about wall angle, baseline grip strength, and endurance.