Friday, September 12, 2014

Hangboard Cycle Results


The graph above plots my 10 second max weight hangs from the grips listed at right.  The y axis reports the amount of weight added to the harness or subtracted via pulleys.   The graph shows that extra weight held for 10 seconds increased during the 3 week cycle for all of the grips by some amount between 12 and ~30 pounds, depending on the grip.  Two of the grips I added on the 3rd workout (large edge and crisp crimp) and one grip I skipped one week due to lack of access.  [Note: during this time period my bodyweight + clothes and harness totalled to about 173 pounds]

Further note:  all of these holds are on the Rock Prodigy board, or the standard metolius wood grips campus rung.  See image on this post.

The plot is ok, but it leaves me wondering: "Which grips did I gain the most, and on which the least?  Is there any logic or pattern to the average amount of gains?"

 To answer these questions I calculated the average weight held for the first 6 observations and final 6 observations for each grip, and then calculated the difference between the two.  Then I sorted from smallest to greatest.

I omit the "Crisp Crimp" from the next graph simply because I was not actually maxing out performance on that hold.  I was gripping that edge with a closed crimp and I was treating it extremely cautiously, so I don't think that the change accurately represent a gain in strength.

On the small campus rung and the small edge I was using the "half crimp" grip or semi-crimp.  To try to describe the grip position: the half crimp grip that I use is the pretty standard way of holding a small campus rung, where the pinky and index fingers are open grip, but the middle and ring are only half crimped. The knuckle closest to the finger tip is straight. This allows me to have all four pads on the rung.
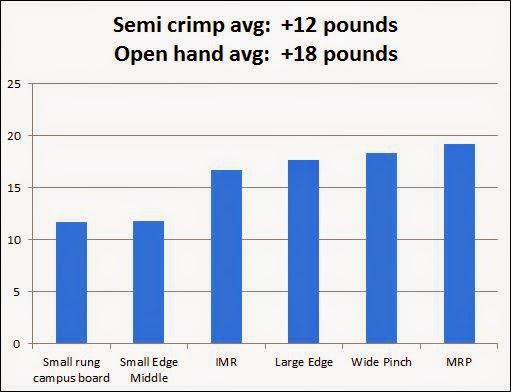

The chart is pretty informative, and it raises some interesting questions about how different types of grips are related and how strength gains might be related to both the grips used and the physiology of the athlete.
  • Sorting by change in additional pounds held groups the holds according to grip type.  The first two (small rung campus board and small edge) are both gripped using a semi open crimp.  The next four are all gripped using and open hand grip.   
  • I gained more strength with the open hand grip than with the closed hand grip
    • For every 2 extra pounds in the semi crimp grip I gained 3 pounds in the open hand grip.  50% more progress seems like a big difference (do other people notice a similar difference in their progress?)
  • I might just be me.  Historically I have been stronger on open hand holds and on moves that emphasize larger holds and endurance.
    • Crimps and power on crimps have long been limiting weaknesses
    • One interpretation of this chart is that I gain strength in open hand holds faster because those muscles respond more strongly to stimulus than do those involved in crimping.
    • An alternative explanation is that I was training more holds (twice as many) that relied on open hand rather than semi crimp grips.  
  • One final observation involves the pinky finger
    • With the exception of the MRP hold, both of the semi crimp holds engage the pinky finger more prominently than do the open hand grips. The pinky is by far the weakest finger.
    • It seems possible that a limiting factor of the semi crimp grip is that is loads the pinky more than the open hand grips, and in the semi crimp the two middle fingers are not in the open hand position which has been highly trained in all the open hand hold grips.  
In conclusion, I don't have enough information to know if the patterns I see in these results are completely idiosyncratic or if they might suggest something more general about how the training of related types of holds influence development of strength in related grip types.  It would be great to hear from other climbers who have recorded similar data from their training sessions.


Saturday, September 6, 2014

I love progress!!


I just finished Hangboard workout #6 and I am totally psyched.  My overall workout strategy is inspired by the Rock Climbers Training Manual but this particular use of HB max weight hangs is motivated by Eva Lopez.  I am making progress, and I can see it clearly by comparing my weights and times from just 11 days ago.  The improvements are noted in the day 6 record, in [square brackets],   If  your gym does not have pulleys and weights for systematically increasing hangboard resistance, you need to ask your gym:  "Why not?"


The reality is that a hangboard set up that does not have weights and pulleys is limiting your progress because you can not see and measure your progress accurately.

Check this out:

HB Day 2
Teach till 7:15 pm.  Ride bike home, warm up in the Dojo with 12 min of easy traversing.

Warm up on the board, with 10 seconds each on the Jugs, Open Hand, Large Edge, Small Edge, MRP pocket.

1.  Open hand repeater, +45 lbs.   3 sets, 120 seconds each , alternating left and right hand for 10 seconds at a stretch.

The following are max weight two handed hangs, ~10 seconds on, 180 seconds rest, 3 sets.

2.  Middle of small edge.  Set 1: +10 pounds, 10, 10. (8 seconds)
3.  IMR.  Set 1: +45 lbs, 45, 45. ~11 seconds
4.  Wide pinch.  Set 1: -25 (fail! 2 seconds), -40, -35.
5.  MRP.  Set 1:  +15, 15, 15. 10 seconds.
6. Small campus rung. Set 1:  +30, 30, 30. 8 seconds.

Contrast with tonight!

HB day 6

Play 2 hours of soccer, mow lawn,

1.  Middle of large edge.  Sets:  +50, +55. +60, +60 (4th set 1 finger width further out)  [NEW]
2.  Middle of small edge.  Sets: +15, +17, +20  [3rd set improvement:  +10]
3.  IMR.  Sets: +55, 60, 60 (11 seconds)  [+15]
4. Wide pinch: -25, 22, 20 (10 seconds)  [+15]
5. Crisp Crimp:  -40, 35, 30 (11 seconds) easy. [New]
6. Small campus rung:  +35, 40, 40 (10 seconds) [+10 lbs, longer hang]
7. MRP:  +20, 25, 30 (11 seconds, ok)  [+15 lbs, longer hang]
8. +50 Open hand repeater, 1 set only.  [+5 lbs]   could have done 2 more sets, but needed to cook dinner.

Weights. 


Pulleys.


Saturday, August 23, 2014

UPDATED: finger strength workout plan


Now with Pulleys!

I have a new plan and an improved setup:  I added pulleys, I am doing max weight hangs instead of repeaters, and I changed to a less tweaky crimp.  I had several very useful conversations online and in person, and think the new plan offers several improvements.  (link to old plan) 

Saturday the 23rd was my first workout for which I warmed up and climbed a brief 12 min ARC set.  And here is what I did on the hangboard:


  1. Hangboard warm up:   hang for 10 seconds on, 10-20 seconds off, on four or five of the holds on the board. 
  2. Open hand 'Warm Up #2' above.  
    1. +40 pounds
    2. 3 sets of 10 second repeaters, alternating right than left hand for 2 minutes, or 10 seconds by 6 repetitions.  3 min rest between sets.  Feet on wall.
    3. Next workout start weight (NWSW):  +45
  3. Small edge, middle area of edge
    1. +5, +8, +10 lbs
    2. 3 reps of 10 second max hangs, 3 min between reps.  NWSW: +10
  4. IMR
    1. +40, +40, +45 lbs
    2. 11, 11, 11 seconds;  NWSW:  +45
  5.   Wide pinch
    1. -40, -35, -30, -25
    2.  11, 11, 12, 8 seconds;  NWSW:  -25
  6. MRP, #2 above
    1. 0, +5, +10, +15
    2. 11, 11, 11, 11 seconds;  WSW: +15
  7. Small campus rung
    1. +40, +40, +40
    2. 9, 7, 8 seconds; NWSW:  +40
  8. Warm down on the Jug
    1. +40 lbs
    2. 3 sets of 10 second repeaters, alternating right than left hand for 2 minutes, or 10 seconds by 6 repetitions.  3 min rest between sets.  Feet on wall;  NWSW:  +45
Why? Why?  Why?
  • Why the alternating one hand repeaters with heavy weight?  For a given level of load per hand, the single handed hangs do not require nearly as much added weight as two handed hangs. Your single hand is suspending your entire upper body plus all of the added weight.  Increased strength on large open hand holds would greatly aid my performance at the Red by increasing my endurance on these routes by allowing me to hold on at a lower percentage of my total effort.  Strength increases on these holds also aid my progress on open hand grips with limited fingers because I am strengthening muscles for all fingers.  
  • Why keep your feet on the wall during your 1 handed repeaters if you are trying to add weight?   Single arm hangs feel very unstable and dangerous to my shoulders unless I keep my feet on the wall.  With feet, I am basically just doing an extended shake out on a good jug, but with lots of extra weight.  
  • Why max weight hangs for most of my workout?  The first principle of strength training on a hangboard should be to build strength by adding weight before reducing hold size.  Eva Lopez advocates for training strength with 10 sec hangs from holds at max weight, with 3 min rests between repetitions.  She has some experimental results that suggest that training max weight before reducing hold size will build strength more rapidly.  It makes sense to build overall finger strength before increasing the leverage disadvantage or reducing available fingers.  Finally, max weight hangs are far kinder on your skin. 
  • Why are you going against the suggestions from the RCTM on strength training?  Actually, I am not, I am just following more closely two of the most important principles:  make your workout specific to your goals, and the best way to increase intensity of hangs is by increasing weight.  Some really good ideas from the Anderson brothers' blog did not make it explicitly into the book, but I think it applies here.  If you are primarily climbing steep routes with larger holds you need to modify the basic plan and add lots of weight and do some one arm hangs.  see hangboarding FAQ #2
  • Why did you get rid of repeaters if they have been shown to be helpful?   I did not get rid of them, but I have moved them to later in my training sequence so that they coincide with some of my power endurance training.  Another reason for starting with max weight hangs is they will help me predict a good starting weight for repeaters.
  • Here is my current training season outline: 
    • Endurance and skill:  ARC
    • Strength: Max weight hangs
    • Power:  campus and limit bouldering
    • Power endurance:  repeaters and PE circuits. 
    • Performance phase
    • Rest  


Tuesday, August 19, 2014

Finger strength training plan


My finger strength training is about to begin.  This means that I have light ARC warm ups and hangboard workouts on the horizon to the next few weeks.  [I actually changed my mind about several aspects of my strength plan, here is the updated version]  


My endurance and skill training is almost completed.  I have enjoyed the whole ARC process, and I feel that I am still gaining new technical insights.   Sadly, I did not get any outdoor mileage on any of these weekends.   A broken water line prevented that, and I lost 2 training days to ditch digging, and my elbow tendonitis was not helped by having to suddenly shovel several tons of gravel and dirt.  

However, the 50ft by 1ft by 30 inch deep trench is dug and filled in again (with help from several wonderful friends).  

On tuesday, August 19th I completed my 8th training day in my ARC session, and I have one session left for Thursday.  I only climbed 1 set of 32 minutes tonight, partly because it was very hot, even after 9 pm. 

Midwest summer climbing:   
sweat runs down your arm and washes off the chalk.

In addition to ARC I also did some preliminary hangboard hangs tonight to calibrate my starting weights and identify the grips that I want to use.    I did this to allow me to rest fully on Wednesday to give my elbows more recovery time.  

Saturday will be my first hangboard workout and I am excited to start a new training chapter.  Here is my set up, and it is imperfect but workable.  Some key details:
  • The hangboard is slightly less than 6 feet off the ground.  
    • This means that if I hang straight arm I need to lift my knees to keep them off the floor. 
  • The board is mounted on a slightly overhanging section of wall, with a slight undercut and several foothold options.
    • This setup allows me to hang freely, put my feet on the wall, or even, rest my feet on the ground.
  • There are no pulleys for taking weight off.  This is a bummer, but the space is limited so I am unlikely to add pulleys here. (Although I could mount the hangboard on the side of the campus board downstairs). 
    • My current solution is to identify which grips I can free hang and add weight, which I will use footholds and add weight, and which I need to rest my feet on the ground and then add weight.
  • It seems counter intuitive to both put your feet on holds and add weight.  However, my plan is to use the same footholds in the same way each  time, and rest the same amount of weight through my feet each set, but to add weight to my harness between set 1 and 2 for each grip.
    • Downside:  this is less precise than simply hanging all holds and using a pulley and weight to change intensity. 
    • Upside:   this is more specific training for climbing, because when you are on a route you will normally be keeping your feet on and maintaining tension through your feet and upper body.    


Based on my goals and some previous training I am trying a couple slight modifications of the RCTM hangboard recommendations.  My plan is partly a compromise between the beginner and intermediate workouts with some modifications due to the limits of my wall, and making my training more specific to my sending goals in October at the Red River Gorge.  Here is my plan in order of grips to be used, beginning with two warm up holds:
  1. In my warm up I want to simulate rest stances on two different warm up grips by putting feet on holds but adding weight on harness and alternating 10 second one arm hangs, 5 reps each arm.   Weight amounts are for set 1 and set 2.  Warm ups / rest stances
    1. Jugs, +15, +23 pounds, one arm hangs.
    2. Open hand grip on pinch holds, +8, +13 lbs, one arm hangs
This open-hand grip seems specific to RRG. 
Open hand with thumb helping but 
pinky is limited at the lip of the hold, not beyond.
  1. Six different grips for beginner duty cycle, but with two sets, and added weight from set 1 to set 2.  I prefer 2 sets to 3 because the hot humid weather makes skin pain the limiting factor.  I am not sure of an exact added weight for each of the following grips..  For these grip 1 will be a dead hang, 2,3,4 will be feet on wall, and 5,6 will be feet on floor.  
    1. Middle of large edge, 10 sec on, 5 off, 6 reps
    2. MRF 3 finger, same cycle for all remaining.
    3. Small edge, on the larger, or outer end. 
    4. IMR 3 finger.
    5. Wide pinch
    6. Small square cut "crisp" crimp.


Friday, August 8, 2014

Training for the Red on a 7 foot bouldering wall


A 5 min ARC training lap in the dojo. 
[please mute / ignore the audio]

I am training for the Red River Gorge on a very short bouldering wall.  At the tallest, the ceiling is between 5 and 7.5 feet.  What the wall lacks in height it makes up for with options for traversing.

Starting in August I have been climbing 3 days a week, and after this weekend (my 6th training day) I will have accumulated about 500 min on the wall.  After that I will have 4 more training days of endurance before I switch to strength training on the hangboard.

When training endurance or "base fitness" I normally stay on the wall for sets that last about 15 to 35 minutes, and rack up a total of 80 min per training day.  That is about all that my skin can handle with the heat and humidity of the South East Ohio summer.

The lap in the video illustrates one of the least steep routes through the room and takes advantage of rests where the ceiling is high enough to actually stand up.  Other times I do laps with big moves from big holds to work full body strength.  However, I already have good endurance on big holds and want to improve my endurance on smaller holds and less steep angles.  So I am trying to spend more time grabbing smaller holds, and resting on holds that are less than full hand jugs.

The Rock Climber's Training Manual advocates for endurance training on wall angles ranging between vertical and 30 degrees but I don't really have much terrain for that.  Hopefully, creative use of rests and using smaller holds than I had used in the past (i.e avoiding most of the jugs and using more 1st and 2nd pad holds) will offset the "too steep" limitation and help me complete some tall endurance routes at the Red this fall.


Friday, August 1, 2014

Maximize your climbing performance for October

Goal:  Flash Twinkie in October

How I am going to do it:


Time to start training for peak performance in October.  Ideally, you will have rested during the last couple weeks of July.   I did one better by driving cross country, visiting with friends and putting on extra training weight with good food and beer.

I plan to keep the muffin top through the strength phase, to maximize value of the hangboard routine.

I am back at the Dojo now, and have started my new training season.  I plan to continue the steady progress I started in the spring season by following a plan based on the Rock Climbers Training Manual by the Anderson brothers.  Here are the key steps to getting started: 
  1. Rest!  Take at least 7 days off from climbing and any training that involves pulling with your hands.
  2. Plan your season.
    1. Assess last season and identify your weaknesses.  For me: 
      1. Endurance on small to medium holds
      2. Finger strength
      3. Resting efficiency
    2. Select concrete goals.
      1. Climb "Twinkie" first try (technically not a flash, I climbed it 19 years ago)
      2. Send: Betavul Pipeline, Check Your Grip, All the Way Baby, Tissue Tiger, Gung Ho, Narcissus, Super Best Friends. . . .
    3. Schedule your season training cycles, including season highlight trips.
      1. See above.
  3. Start climbing again with your first training cycle
    1. ARC (endurance), body weight fitness and skill training.
  4.  Keep good records in your training and climbing journal.


October will be here before you know it!

Friday, July 18, 2014

Get up for the down climb. . . everybody get up.


When it comes to bouldering, everyone is trying to get up, but once they get up, they need to GET DOWN! Too often, indoor boulder problems take you up high and leave you stranded.  The harder the problem, the harder it is to use it as a down climb, and for many folks this means dropping off.  

Why you should GET DOWN on a downclimb instead of dropping off:
  1. Avoid impacts and stress to your spine / back during normal landings.
  2. Avoid ankle, wrist and other injuries from landing poorly.
  3. Practice downclimbing technique.
  4. Train for power endurance or endurance. 
  5. Develop mental strength.
  6. Practice sequence visualization while on the wall.
These reasons can apply to everyone.  However, we older climbers especially appreciate #1 and #2,   And, we climbers who want to use bouldering gyms for training, especially appreciate #3 and #4.  Reasons #5 and #6 are especially important for sport climbers pushing for their redpoint limits.  The capacity to get your head together while on the wall is crucial for successful redpointing and if you don't practice it, it will feel stressful on the send.

The rest of this post is divided into two sections, advice for climbers, and advice for route setters / route setting managers. 


Bring that chalk bag.

Advice for climbers:  Use downclimbing to diversify your climbing sessions to increase your moves per set, especially during your warm up and cool down periods.

  1. Bigger warm ups and downs.  Increase your average moves per warm up by 2X or 3X.   If you normally warm up with six 12-14 move V0's,  combine them into 2 sets of 3 problems, down climbing the easiest.  
  2. Bring a chalk bag you can wear.  This seems obvious, but it is fashionable these days for boulderers to only bring a floor mounted chalk-pot.   That is cool and all, but it won't get you to the top of Lactic Acid Bath in August, or safely off the top of your local highball.
  3. Set your pace as an inverse of difficulty.  With your unfashionable chalk on your hip, practice using it at all the best rest stances.   My friend Margarita advises:  "If you like where you are, rest.  If you don't, move."  If you control your pace as an inverse of difficulty, you will find you have plenty of time to visualize the upcoming difficulties as you rest.
  4. Embrace the funk!  Use steady flowing music to motivate your long, smooth climbs.   I find the St. Germain station on Pandora to be near optimum for grooving on the wall for longer time periods.  Stay on the wall for two full songs in a row and you will feel it. 


Rene puts in time on the wall at the Shop.

Route setting advice:   All good bouldering gyms have the potential to help climbers GET DOWN with down climbs, but here are a few principles that can be integrated into the route setting to make it easier for climbers to train better, improve their technique, avoid injuries and needless wear and tear.    
  1. Moderation:  Down climbs should be a few grades easier than the adjacent up problems, they should have plenty of foot options, and generally should allow climbers to practice good technique.   Standard jug haul problems can be used for down climbs, or gyms can add holds to existing sections of wall, and encourage down climbs on any holds in a certain area of the wall. 
  2. Hold selection:   Side pulls, generous pinches, and positive jugs  are generally easier and safer to down climb than problems with slopers, or moves like long lock-offs or deadpoints.   Why?  Jugs, side pulls, and good pinches are less body position specific, and when down climbing you have to control your body’s momentum through a wider range of positions relative to the holds.  
  3. Campgrounds:    problem sets should integrate 'campgrounds' to help climbers improve their resting technique and to avoid crowding.   A campground is a stance that allows climbers to hangout, match, chalk, and de-pump on the wall.  It also allows climbers to wait their turn in case another climber is linking through the same section of wall.   Add campgrounds in sets of 2 such that two climbers could rest at the same time, and avoid blocking each other in their upcoming sections. 
  4. Integrated playlists:  Design sections of walls into integrated sets of problems.    Each problem is like a song, and each section of wall is like an album or playlist.   Intentionally setting the problems in linked sets make it possible to use down climbs to connect the up problems.   This is the key to using bouldering gyms to train for endurance, and one that most gyms miss.


MVWL, etc.
  1. It is helpful to think of the layout of the problems in terms of combinations of letters.  Good shapes include letters like M,V,W,L.   On overhanging walls,  L and reverse L down climbs can be used to link to whole sets of up problems, especially when the wall top includes a lip traverse.  This prevents the low traverse from interfering with the upper sections of the problems.  
  2. Set aside different sections of walls for climbers of different levels to enjoy long link-ups.   For instance, make three different regions of your gym each with an integrated playlist suitable for ARC training for climbers at low, medium, and high levels of challenge.  

Conclusion:  Finally, route setters and climbing instructors should work together to both promote and educate local climbers on how to best take advantage of the integrated problem sets and down climbs at your gym.   Without adding any extra space or holds, your gym can create valuable training resources, and in doing so, raise the overall quality of experience at your gym.