Thursday, February 23, 2012

Heart shaped hueco


This boulder sits beside the rock-house trail near the (8) crimpy corner area (see map).  There is an ultra-direct climber approach trail that leads directly to the downhill side of the boulder.  While hiking the flat section of the cucumber tree connector trail, look for a trail leading steeply uphill along a ridge.  Follow this up, over a fallen tree and to this boulder.  

An acceptable warm up traverse starts in the heart shaped hueco and proceed right to left along the lip of this boulder.  Another traverse is possible on the opposite side, on less mossy and sharper stone.

Friday, December 3, 2010

Open hand training holds

1.  Finger bucket for 30 degree and steeper walls.


2. Wider version of same design, placed on roof section.
While reaching up and out from the 30 degree wall below
this type of hold makes a challenging open-hand match.

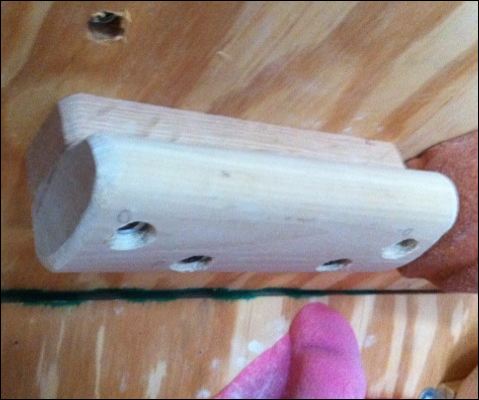
3.  Same design, but made with round hand rail for 'slabbier' walls.
Rail is flush with backing to make deeper,
comfortable open-hand edge.

4.  Open hand training hold, with thin rail. 
This design uses a pine 2X3, with one corner ripped off;
plus a thin oak molding.

5.  I made about 10 of these open hand trainers to create 
a mini system wall in the kids area of the dojo.


All of these holds are basic edges that are intended to be installed semi-permanently at particular angles, and with one face up.  This is a good solution for home walls because such simple designs are easier and faster to make than general purpose holds, and they can fill in space around the bolt on holds.  While basic edges are "boring" they are the most common type of hold, especially on sandstone, and are a great resource for training.

The last type of the training hold [image 4. above] brings up a couple of general points about hold layout.   In a home wall, you should create spaces that allow you to train in different ways.  The last image shows a small section of slightly overhanging wall above a small angled roof.   This a great place to work on hanging slopers, but thin edges are hard to use here because holds immediately underneath can obstruct access the thin edge or impinge on your forearm.

Placing the thin edge on the face of the sloper means that you can still access the thin edge even with a more bulky hold immediately below it.  Plus, an array of these training holds let you practice similar movements from both sloping and thin open-hand edges.

Thursday, November 25, 2010

Mass produce home-made holds

Crude illustration shows profile of hold; 12 ft sections; 
and series of three sets of pre-drilled holes.


Home bouldering walls always need more holds.   One solution is to mass produce some basic shapes, and then introduce slight variations to them while you create.   Here is a great design for medium size edges or "finger buckets".  I make extensive use of versions of this hold on our 60 degree and 30 degree walls.   The idea here is to make two to three dozen holds at once.

Example of mass produced "finger bucket"

Materials:
  1. One 12 foot section of oval hand rail, like that pictured in the hand rail jug photos.
  2. One 12 foot section of narrow rectangular oak molding (as narrow as the flat bottom of the rail.)
  3. Wood glue
  4. Drywall screws, small washers
Tools:
  1. Large table clamp or "Work Mate" type work table.
  2. Small clamps or weights to press the sections together
  3. Electric drill, with bits sized for hole and countersink
  4. Sanding disc for drill (coarse grade)
  5. Circular saw
  6. Protective eye wear

Set up and Glue: 
The oval hand rail should have a flattened bottom side.   Line this side up with the molding, and make sure that you think about which side will be the "functional" side of the hold.   These are meant to be generic downward pulling edges, so, line up the two pieces of wood so that it will make a lip that will be comfortable to use on your wall surface.  The molding acts as a spacer that provides room for your fingers to grasp the edge of the handrail.   I chose to vary overhang from one end that is nearly flush with the edge of the moulding to about a centimeter of the flat base exposed at the other end.  

Spread glue along the length, wipe it smooth, and clamp or press the two boards together along their length.   Let the glue set overnight or at least several hours.  

Mark and drill:
With a pencil, mark your cut points.  I varied the sections from 3 to 6 inches in length.  Mark the short sections with three screw holes (two on the functional side one on the other).   I use 4 screws on the 6 inch matching edges.   Make sure all of your holes will pass through both pieces of wood.  I missed with several, and had to re-drill.

Clamp the beam of wood in your table clamp. After you have marked all of your drill holes, attach your drill bit for the counter sink hole, which should a flat spade type bit that is slightly wider than your small washers.   Drill all of the counter sink holes, then all of the actual holes, BEFORE your cut the glued beam into sections.    Inspect your drilled holes to make sure they come through the base on the back, they are fully drilled.  Always  chose a hole width greater than the width of the screws so you can just slide the screws into the holds.  

Cut and sand:
Put a card board box under the end of the beam.  Saw the hold sections off into the box, adjusting the beam in the clamp so that a bit overhangs the edge of the table as you go.  

Put the sanding disc on your electric drill (corded) and clamp it in the table clamp-- basically a cheap version of a table disk sander.  Take the holds one at a time and (using the section of the disc that rotates away from your body) sand off any sharp edges that might be touched during use.  Modify the usable edge of the hold as you see fit.   


Thursday, November 11, 2010

Perfect Fall Conditions


Athens boulderers have enjoyed perfect fall conditions during November.  This photo is from a recent family hike to the COAD area.   The "Wood Chimes" sculpture (author unknown) was installed this fall near the intersection of the Rock House Trail and the Cucumber Tree Connector.

Tuesday, March 9, 2010

Home made climbing holds


Here is a list of posts about making home made holds:

NOTE:   see DIY holds and walls page.  
  1. Our wall
    1. Updated
  2. Overview of hold making
  3. Handle bars
  4. PVC pinches
  5. These are all on the same page:
    1. PVC Handlebars and pinches with endcaps
    2. PVC cap footholds
    3. Doubled 2X3 pinches
    4. Directional jugs from layered slats

More to come.

Sunday, March 7, 2010

Perfect Conditions

Perfect conditions: for a leaf fight! The trails are muddy in the spring, but Athens bouldering is coming back to life.

Monday, March 1, 2010

PVC pinches FTW

I bought two 10ft sections of PVC (3.5 and 2.5 inches), each for about eight bucks at Lowes. I also bought a corner piece of 3.5 for five bucks. I cut them to various lengths with a circular saw, and pre-drilled holes for bolting them up. I used a combination of standard bolts into T-nuts, lag screws and drywall screws to attach them. The holds will flex a bit under load, but so far they seem plenty durable. Notice the extra large washers, and how we stacked the washers to get contact in a wide area. I can’t imagine tearing through the pvc on such large of an area. If someone can exert that much force on a 3.5 inch tube, pulling down on a ceiling they should try out for the role of Mr. Incredible.

Texture is provided by 6 inch, 180 grit, self adhesive sandpaper discs. So far, the discs have stuck admirably well, with the exception of on the curved piece, where the shape prevents us from having sufficiently wide sections. On that section the paper slowly slides down under full load. Another potential shortcoming is that it is likely that the adhesive is temperature sensitive, and might not work very well in the summer. For wintertime bouldering in our garage we seldom have the heat on high enough to worry about the adhesive softening up.
The pipes are a great asset in terms of hold type and in their “feature-ness”. It is great to have a 5ft pinch rail crossing a section of the roof. It allows a more Hueco-type feel for many of the problems, where beta depends on where you choose to use the hold, rather than which hold to use.
I am sure that heavy climbers or extreme dynos could lead to hold failure in gym conditions—but I doubt we will have problems in a home wall, especially because our low ceiling precludes dynos of any size. Obviously—we don’t grab the sharp ends of the pipes. Another reason these holds are good for home walls but not so much for gyms, where you can’t trust folks not to do foolish things.

How are they to use? Effort is very dependent on body position, the closer to the center of your body the harder it is to use the thumb effectively. In cramped quarters they can be a bit tweaky. Gripped wider than shoulder width they feel great—challenging and non injurious. Using the holds builds pinch capacity pretty quickly. During the first week the section on the 60 degree wall seemed desperate, and now it is pretty casual.